
User guide


34 D
OMINION
PX U
SER
G
UIDE
%#-%#$
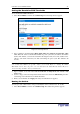
To set up RADIUS authentication:
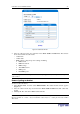
1. Select Device Settings, and then select Authentication. The Authentication Settings window
appears. The RADIUS parameters appear on the right side of the window.
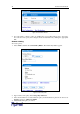
Figure 35 Authentication Window RADIUS Parameters
2. Click the radio button labeled RADIUS.
3. Type the IP address of the RADIUS server in the Server field.
4. Type the shared secret in Shared Secret field. The shared secret is necessary to protect
communication with the RADIUS server.
5. By default, the Revelation PDU uses the standard RADIUS ports 1812 and 1813. If you
prefer to use non-standard ports, change the ports.
6. Type the timeout period in seconds in the Timeout field. This sets the maximum amount of
time to establish contact with the RADIUS server before timing out. Default is 1 second.
7. Type the number of retries permitted in the Retries field. Default is 3.
8. If you have additional RADIUS servers, click the More Entries button. Fields for four
additional servers appear. Enter the same information in Steps 2 7 for each additional
server.
9. Select an authentication protocol from the drop-down list in the Global Authentication Type
field. Your choices are:
− PAP (Password Authentication Protocol)
− CHAP (Challenge Handshake Authentication Protocol)
CHAP is generally considered more secure because the user name and password are
encrypted, while in PAP they are transmitted in the clear.
10. Click Apply. RADIUS authentication is now in place.
%.'2
The Revelation PDU is shipped with certain Revelation PDU and outlet power thresholds already
defined. You can change the default Revelation PDU thresholds, and you can give each outlet a
name and change its default thresholds.
When setting the thresholds, keep in mind that you can set up alerts that are triggered whenever
any of these thresholds are crossed. Refer to “Setting Up Alerts” below for details.