
User guide


C
HAPTER
4: U
SING THE
W
EB
I
NTERFACE
25
2. Click the check box labeled Enable IP Access Control. This enables the firewall.
3. Click Apply. The firewall is enabled.
- '$
Once enabled, the firewall has a default policy built in that accepts traffic from all IP addresses.
This means any IP addresses not dropped by a specific rule will be permitted to access the
Revelation PDU. You can change the default policy to DROP, in which case traffic from all IP
addresses will be dropped except traffic allowed by a specific ACCEPT rule.
To change the default policy:
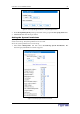
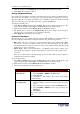
1. Select Device Settings, and then select Security. The Security Settings window appears. The
panel at the upper right is labeled IP Access Control. This controls the firewall.
2. Make sure the check box labeled Enable IP Access Control is checked.
3. The default policy is shown in the Default Policy field (refer to Figure 26). To change it,
select the policy you want from the drop-down list in the field.
4. Click Apply. The new default policy is applied.
!2
Firewall rules accept or drop traffic intended for the Revelation PDU, based on the IP address of
the host sending the traffic. When creating firewall rules, keep the following in mind:
•
Rule order The order of the rules is important. When traffic reaches the Revelation PDU,
the rules are executed in numerical order. The first rule that matches the IP address
determines whether the traffic is accepted or dropped. Any subsequent rules matching the IP
address have no effect on the traffic
• Subnet mask When typing the IP address, you MUST specify both the address and a
subnet mask. For example, to specify a single address in a Class C network, use this format
x.x.x.x/32
where /32 = a subnet mask of 255.255.255.0.To specify an entire subnet or range of addresses,
change the subnet mask accordingly.
To create firewall rules:
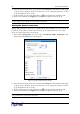
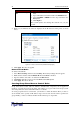
1. Select Device Settings, and then select Security. The Security Settings window appears. The
panel at the upper right is labeled
IP Access Control
. This controls the firewall.
2. Make sure the check box labeled
Enable IP Access Control
is checked.
3. Create specific rules. The following explains how:
A
CTION
D
O THIS
…
Add a rule to the end
of the rules list
1. Type an IP address and subnet mask in the IP/Mask field.
2. Select ACCEPT or DROP in the Policy field.
3. Click Append.
Do NOT enter a rule number. The system automatically
numbers the rule.
Insert a rule between
two existing rules
1. Type the higher of the two rule numbers in the Rule #
field. For example, to insert a rule between rules #5 and #6,
type 6.
2. Type an IP address and subnet mask in the IP/Mask field.
3. Select ACCEPT or DROP from the drop-down list in the
Policy field.
4. Click Insert.
The system inserts the rule and automatically renumbers the
rules.