
User guide


20 D
OMINION
PX U
SER
G
UIDE
-'
To delete a user profile:
1. Select User Management, and then select Users & Groups. The User/Group Management
window appears.
2. Select the user profile you want to delete from the drop-down list in the Existing Users field.
3. Click Delete. The user profile is deleted.
%'
If you selected
None
for User Group when creating a user profile, you must set the user’s
permissions individually. Until you do this, the user is effectively blocked from all system
functions and outlets.
% '
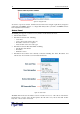
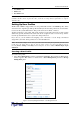
To set the system permissions:
1. Select User Management, and then select User/Group System Permissions. The User
Group System Permissions window appears (refer to Figure 23 below for a picture of this
window).
2. Select the user from the drop-down list in the User (not in group) field. The drop-down list
shows all user profiles that have NOT been assigned to a User Group.
3. Set the permissions as necessary. Click this icon in a field and select either Yes or No.
4. When you are finished, click Apply. The permissions are applied to the user.
.'
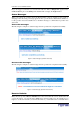
To set the outlet permissions:
1. Select User Management, and then select User/Group Outlet Permissions. The
User/Group Outlet Permissions window appears (refer to Figure 24 below for a picture of this
window).
2. Select the user from the drop-down list in the User field.
3. Set the permissions as necessary. Click this icon in a field and select either Yes or No.
4. When you are finished, click Apply. The permissions are applied to the user.
%
The Revelation PDU is shipped with one User Group built in. This is the Admin User Group.
This User Group provides full system and outlet permissions. It cannot be modified and it cannot
be deleted.
When creating user profiles, the User Group field defaults to the Admin User Group. This
means that if you do not change the entry in this field, the user will enjoy full system and outlet
permissions. To restrict the user’s permissions, create a User Group with limited system and/or
outlet permissions, and assign the user to that group.
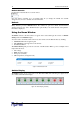
To create a User Group:
1. Select User Management, and then select Users & Groups. The User/Group Management
window appears. This window is divided into a User Management panel and a Group
Management panel.