
User guide


C
HAPTER
4: U
SING THE
W
EB
I
NTERFACE
19
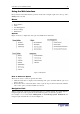
2. In the User Management panel, type the following information about the user in the
corresponding fields:
F
IELD
T
YPE THIS
…
New user name
The name the user will enter to log into the Web interface
Full Name
The user’s first and last names
Password
Confirm Password
The password the user will enter to log in. Type it first in the
Password field and then again in the Confirm Password field.
The password must be at least four characters long, and spaces
are not permitted. The password is case sensitive, so be sure to
capitalize the same letters each time.
Email address
An email address where the user can be reached
Mobile Number
A cell phone number where the user can be reached
Note: New user name, Password, and Confirm Password are the only required fields.
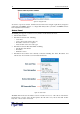
3. Select a User Group from the drop-down list in the
User Group
field. The User Group
determines the system functions and outlets this user can access.
If you select None, the user is not assigned to a User Group. This means you have to set the
user’s permissions individually. Until you do this, the user is effectively blocked from
accessing any system functions and outlets. (For instructions on setting permissions
individually, refer to “Setting User Permissions Individually” below.)
4. If you would like this user to set his or her own password, click the check box labeled
Enforce user to change password on next login. The user logs in the first time using the
password you entered above, and then is forced to change it to one of his or her choice.
5. Click Create. The user profile is created.
'
You can create a new user profile with the exact same settings as an existing profile by using the
copy function. You can then modify the profile so that it differs as necessary from the original.
This is a quick and easy way to create user profiles.
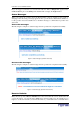
To copy a user profile:
1. Select User Management, and then select Users & Groups. The User/Group Management
window appears.
2. Select the existing user profile from the drop-down list in the Existing Users field.
3. Type the name of the new user profile in the New User Name field.
4. Click Copy. A new user profile is created with the same settings as the existing profile. The
new profile can be seen by clicking the drop-down list in the Existing Users field.
'
Every user with user management permissions can modify a user profile. (Refer to “Setting the
System Permissions” below for information about setting user permissions.)
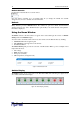
To modify a user profile:
1. Select User Management, and then select Users & Groups. The User/Group Management
window appears.
2. Select the user profile you want to modify from the drop-down list in the Existing Users field.
All the information in the user profile is displayed except the password.
3. Make all necessary changes to the information shown. To change the password, type a new
password in the Password and Confirm Password fields. If the password field is left blank,
the password is not changed.
4. Click Modify. The user profile is modified.