
User guide


4 D
OMINION
PX U
SER
G
UIDE
'- 2 $
Once the Revelation PDU is connected to your network, you must provide it with an IP address
and some additional networking information.
Note: The Device Setup Wizard is an alternative way to configure an Revelation PDU for
network connectivity. Refer to Appendix E for details.
1. Go to the computer that you connected to the Revelation PDU and open a communications
program such as HyperTerminal or Putty. Make sure its port settings are configured as
follows:
−
Bits per second = 9600
−
Data bits = 8
−
Stop bits = 1
−
Parity = None
−
Flow control = None
2. Point the communications program at the serial port connecting the Revelation PDU and open
a terminal window.
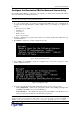
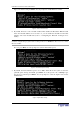
3. Press Enter to display the opening configuration prompt.
Figure 3 Opening Configuration Prompt
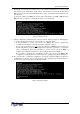
4. Type config and press Enter to begin the configuration process. You are prompted to select
an IP configuration method.
Figure 4 IP Configuration Prompt
5. You must assign the Revelation PDU an IP address. There are two ways to do this:
−
Auto configuration Select an autoconfiguration method such as dhcp or bootp and let
the DHCP or BOOTP server provide the IP address.
− Static IP address Select None and assign the Revelation PDU a static IP address. You
will be prompted for the address, network mask, and gateway.
Note: The Revelation PDU’s IP address is automatically displayed in the system prompt. The
default IP address is 192.168.1.22. This will be replaced by the address assigned by DHCP or
BOOTP, or the static IP address you entered, as soon as the configuration process is complete.