Eaton® LifeSense® Wireless System Quick Setup Guide
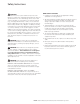
LifeSense Wireless System Quick Setup Guide Each LifeSense kit contains: • LifeSense hose assembly (1-100) o Sensor assembly (one per hose assembly) FCC ID 2AABYS01; IC: 12063A-S01 o Protective sleeve (one per hose assembly) • Wireless gateway/hose diagnostic unit (1) FCC ID 2AABYG01; IC: 12063A-G01 o Power cord (1) o Programming cable (1–sold separately) o WIFI antenna (1) o Sensor antenna (1) o Sensor Key Fob (2) This device complies with part 15 of the FCC Rules.
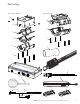
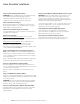
Part Listing Sensor Type 1 (-08 and -12) Sensor Type 2 (-16) 1 2 2 4 3 3 6 4 7 5 9 8 10 12 11 POWER CONNECTOR 13 POWER CORD SETUP CABLE GATEWAY CONNECTOR 11 CABLE 1 CABLE 2 PC CONNECTOR EATON LifeSense Wireless System Quick Setup Guide E-HOOV-II002-E August 2014 3
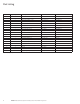
Part Listing Item No. Description Part Number Material 1 Qty. Req'd.
Safety Instructions WARNING The Eaton LifeSense system utilizes unique hose and fittings (U.S. Patent No. 7,555,936 and 8,183,872). Only the specified LifeSense hose and fittings can be used in this system. DO NOT use other Eaton hose and hose fittings (e.g., Aeroquip, Weatherhead, or SEL), or hose and hose fittings supplied by another manufacturer with this system.
Hose Assembly Installation Step 1: Depressurize Hydraulic System WARNING: Before installing any hose assembly first verify the equipment has been properly depressurized. For depressurization instructions please refer to the equipment owner's manual for specific instructions. Step 9: Connect Wireless Gateway (HDU) to Power Source WARNING: The power cable must be connected to a 12- or 24-volt DC power source. Before proceeding ensure the power source is turned off.
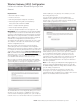
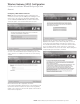
Wireless Gateway (HDU) Configuration LifeSense Installation Wizard/Configuring a New Account will be installing my own gateway.” This will take you to the discovering gateway screen.
Wireless Gateway (HDU) Configuration LifeSense Installation Wizard/Configuring a New Account A pop-up message similar to the one shown will appear if the installation wizard has successfully discovered the gateway. Click OK. Example: If your credentials are not accepted please contact your respective Eaton customer service representative for assistance.
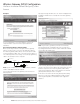
Wireless Gateway (HDU) Configuration LifeSense Installation Wizard/Configuring a New Account Configuring a New LifeSense Account Note: This quick setup guide assumes setting up a new LifeSense account. If you are adding to an existing account please refer to the LifeSense Assembly, Installation and Service Manual (E-HOOV-TI001-E2) for further instructions. Select the option “I do not have a LifeSense account.” You will need to create a username and password for the account.
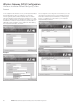
Wireless Gateway (HDU) Configuration LifeSense Installation Wizard/Configuring a New Account In the equipment information screen you will input information that will describe the piece of equipment on which the wireless gateway (HDU) will be installed. Note the wizard will automatically insert the Gateway ID number for you. Tab through the fields to input the equipment number (e.g. vehicle identification number or model number), its serial number if applicable, and a description of the equipment.
Wireless Gateway (HDU) Configuration LifeSense Installation Wizard/Configuring a New Account In the Configure Account - Sites screen you will input information to help you identify the site (e.g., truck depot) within a region where the equipment is located. Click Next after you have completed filling out each of the required fields.
Wireless Gateway (HDU) Configuration LifeSense Installation Wizard/Configuring a New Account If you need to add more contacts, input each additional contact’s information, clicking Save Contact and OK after each subsequent entry. Example: Upon clicking the Close button on the Contact input screen you should see all of the contacts you loaded in the Contacts and Alerts screen. When you are finished inputting the contact information, click the Save Contact button.
Wireless Gateway (HDU) Configuration LifeSense Installation Wizard/Configuring a New Account Configuring by Ethernet Connection Note: Be sure to have gathered the information listed in the Internet setup portion of the Wireless Setup Information Form. The NIST and DNS IP addresses as well as the network information needed for the Internet connection is critical for the upcoming steps.
Wireless Gateway (HDU) Configuration LifeSense Installation Wizard/Configuring a New Account USB thumb drive or memory stick), for upload. When the sensor data is successfully loaded click Next. Configuring with No Sensors You may also elect to skip configuring the sensors to the wireless gateway (HDU) if you would prefer to add them at a later time; to do so, check the box next to Configure with no sensors. Click Next. The wizard is now able to configure the wireless gateway (HDU) and customer account.
Wireless Gateway (HDU) Configuration LifeSense Installation Wizard/Configuring a New Account When you are completely satisfied with your selections click on the Configure Gateway button. To verify the gateway you have just configured is successfully communicating to the Eaton server open your Internet browser and navigate to the LifeSense web portal by typing the following address (http://portal.lifesensehose.com) into the address or URL field.
Wireless Gateway (HDU) Configuration LifeSense Installation Wizard/Configuring a New Account Configuring by WIFI Connection Note: Be sure to have gathered the information listed in the Internet setup portion of the Wireless Setup Information Form. The NIST and DNS IP addresses as well as the network information needed for the internet connection is critical for the upcoming steps.
Wireless Gateway (HDU) Configuration LifeSense Installation Wizard/Configuring a New Account Manual Input Type in the unique sensor ID in the given field and then tab over to the Sensor Location field and type in a description of where the hose assembly with sensor is located on the equipment. When all sensors in the system have been inputted click Next.
Wireless Gateway (HDU) Configuration LifeSense Installation Wizard/Configuring a New Account A popup screen will appear listing the setting selections you’ve made for the gateway. If you are satisfied with the selections you’ve made click the Configure button. Click finish to exit the Lifesense installation wizard application. If you need to make changes, click the Cancel button, then use the back button to navigate to the applicable screen(s) where you need to make your modifications.
Wireless Gateway (HDU) Sensor Association Associating a Sensor with the Wireless Gateway (HDU) In order to extend battery life the sensor comes from the factory in “shelf mode.” It needs to be associated with the gateway and put into a normal run mode. After associating the sensor to the gateway through the installation wizard, place the magnet of the key fob into the round mating hole on the top of the sensor for one (1) second. The LED light will flash three (3) times if successful.
Troubleshooting Issue Steps The wireless gateway (HDU) OK LED does not turn green. If no LEDs are illuminated check the power supply. If the other LEDs are illuminated the wireless gateway (HDU) is still initializing. This process should be complete within two (2) minutes. If the OK LED light does not come on after the two-minute power cycle the wireless gateway (HDU) needs to be replaced. The sensor fails to associate with the wireless gateway (HDU).
LifeSense Wireless Setup Information Wireless Gateway (HDU) UID: Customer Setup User Name: Password: Asset Information Equipment Number: Serial Number: Equipment Type: Region and Site information is optional. Region ID: Region Name: Region Description: Site ID: Site Name: Site Address: Alert Contact Name: Contact Phone: Contact E-Mail: Internet Setup The following information will be needed to setup your gateway and its connection to the backend server.
LifeSense Wireless Setup Information Sensor Information Sensor Identifier 1 2 3 4 5 6 7 8 9 10 11 12 13 14 15 16 17 18 19 20 21 22 23 24 25 26 27 28 29 30 31 32 33 34 35 36 37 38 39 40 41 42 43 44 45 46 47 48 49 50 22 Location Sensor Identifier 51 52 53 54 55 56 57 58 59 60 61 62 63 64 65 66 67 68 69 70 71 72 73 74 75 76 77 78 79 80 81 82 83 84 85 86 87 88 89 90 91 92 93 94 95 96 97 98 99 100 EATON LifeSense Wireless System Quick Setup Guide E-HOOV-II002-E August 2014 Location
Eaton Hydraulics Group USA 14615 Lone Oak Road Eden Prairie, MN 55344 USA Tel: 952-937-9800 Fax: 952-294-7722 © 2014 Eaton All Rights Reserved Printed in USA Document No. E-HOOV-II002-E August 2014 Eaton Hydraulics Group Europe Route de la Longeraie 7 1110 Morges Switzerland Tel: +41 (0) 21 811 4600 Fax: +41 (0) 21 811 4601 Eaton Hydraulics Group Asia Pacific Eaton Building No.