
Installation Manual

Eaton
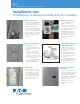
Residential loadcenter and circuit breakers
Installation tips
CH & BR plug-on neutral loadcenters and circuit breakers
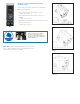
Green bonding screw
•
The green bonding screw
comes unthreaded.
•
When required to bond the
ground and neutral, thread the
green bonding screw into case
with 40 in-lbs of torque.
•
For applications when the
ground and neutral should
not be bonded, it is recom-
mended that the green screw
is removed entirely and
discarded.
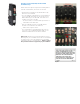
Main breaker loadcenters
and terminal insulators
•
Install terminal insulators to
the service entry cable and
line-side lugs of the main
breaker device.
•
All 225A and smaller main
breaker loadcenters ship from
the factory with a terminal
insulator kit.
•
The terminal insulator kit will
need to be purchased sepa-
rately for main breaker load-
centers greater than 225A.
Ordering a convertible
loadcenter
•
To order a convertible loadcen-
ter, select a loadcenter catalog
number with “N” or “E” as
the main device designation.
•
“N” indicates convertible load-
center with no main device
installed at factory.
•
“E” indicates convertible
loadcenter with main lugs
installed.
Drywall offsets tabs
•
For flush mount applications,
utilize the drywall offsets at
the top and bottom on both
sides of the loadcenter.
•
Push the tabs out 90 degrees
so that they are perpendicular
to the side of the loadcenter.
•
When installing the loadcenter
between studs, the tabs help
provide the proper drywall
offset.
Keyhole hanging feature
•
Take advantage of the
keyhole hanging feature for
an easy and hassle free cover
installation.
• Place the top two cover
screws in the loadcenter
case holes. Then, align the
top two cover keyholes with
the top two cover screws to
easily hang the cover.
• The cover keyhole hanging
feature also works for
bottom feed applications.
Torque rating
•
The torque rating information
can be found on the loadcen-
ter PUB. Refer to the chart
on the PUB for the specific
torque value required. After
referencing the chart, use a
torque wrench to torque to
the specified value.