
Installation Manual


©2015 EasyHeat www.easyheat.com 14183-001 Rev 0
US T. (800) 537-4732
CAN T. (800) 794-3766
7
oor nishing). Consult with your local electrical and/or building
inspection authorities.
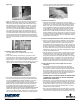
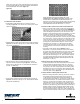
3.1 Proceed with ooring installation
• Once the cables have been installed in the membrane on the oor,
mortar is applied over the heating cable and membrane such that
cables are completely embedded in mortar. Apply sufcient
mortar in accordance with membrane manufacturer’s installation
instructions. Complete ooring installation in usual manner. For
optimum performance, the top of the heating cables must not be
more than 3/4” (19 mm) below the nished oor surface. After
mortar is dry, repeat test of system as per 2.7 and record results in
log.
4.1 Connect power supply wiring and cold lead conductors to
heating controller
Installation of heating controller and associated wiring must be in
accordance with the manufacturer’s instructions and all applicable
national and local electrical codes and ordinances.
• Prepare for power supply wiring connections as follows: Ensure
the power supply branch circuit has been disconnected and de-
energized.
• Prepare the Cold Lead for connection to the heating controller:
carefully remove 6” (15 cm) of the black outer jacket. AVOID
DAMAGING THE UNDERLYING COPPER GROUND BRAID!
Separate braid wires from the cold lead conductors and tightly
twist braid strands together into a single stranded conductor and
con¬nect to ground in the ECB. Strip ½” (13 mm) of insulation from
each of the cold lead conductors.
• Trim excess length from the power supply wiring as necessary and
connect.
• Connect power supply wiring and DMC cold leads to the controller
following the associated manufacturer’s instructions. Do not
energize the system until the mortar/grout materials of the nished
oor have fully cured. This will ensure that the setting of the mortar/
grout will not be compromised by the heat from the cables – refer to
the mortar/grout manufacturers’ instructions for cure times. Once
curing is complete, energize controller and verify oor warming.
Typical oor temperature setting is 29°C (85°F). Most oors will
take about an hour to fully come up to set temperature – most
thermostat “auto” programs take this into account. If manually
adjusting thermostat, allow extra time for the oor to come up to
temperature.
TROUBLESHOOTING TIPS
If the overall oor surface feels unusually cool after the system has been
energized for more than three hours, verify that the heating controller is
correctly installed and functioning properly; check with the associated
heating controller’s operating manual and/or contact the manufacturer.
If the overall oor surface feels unusually hot when the system is
energized, or if the circuit breaker trips when the system is energized,
the cable may be damaged. De-energize the system immediately and
contact EasyHeat at 800/537-4732 for assistance. Note: In the event
that the heating cable has been damaged, the fault can typically be
located and eld repaired with minimal ooring removal. The EasyHeat
DFTRK repair kit has the components needed to splice the heating
cable.
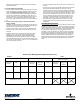
Electric Floor Warming Cable System Resistance Log
Installer:____________________ Date:______________
Product Specications System Resistance (10-500 Ohms) Insulation Resistance Test
(Minimum 10 M Ohm)
Cable Model
Number
Watts Amps
Initial (Out of
Package)
Before
installing oor
covering
Final
Initial (Out of
Package)
Before
installing oor
covering
Final
Sensor Wire (7-14 K Ohms)