Eastern Tools & Equipment, Inc Liquid Propane Portable Generator Operation Manual 7000 Surge Watts 6000 Continuous Watts Customer Service(888)‐908‐6200 www.easterntools.com Eastern Tools & Equipment. Inc Ontario, CA U.S.
Thank you for purchasing products from EASTERNTOOLS & EQUIPMENT, INC. We appreciate your business. The following manual is only a guide to assist you and is not a complete or comprehensive manual of all aspects of maintaining and repairing your generator. The equipment you have purchased is a complex piece of machinery. We recommend that that you consult with a dealer if you have doubts or concerns as to your experience or ability to properly maintain or repair your equipment.
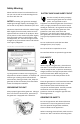
Safety Warning Please read this manual to understand how to use your unit as well as understanding the risk the come with the unit. ELECTRIC SHOCK AND SHORT CIRCUIT Be sure to notify the utility company when using the generator for backup power. Use approved transfer equipment to isolate the generator from electric utility. In highly conductive area such as metal decking or steel work, use a ground circuit fault interrupter. Never touch the generator if the generator is wet.
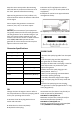
Keep the same concept when disconnecting electrical devices; make sure all devices are in the "OFF" position before disconnecting. 4. Remove oil fill cap/dipstick to add oil. 5. Add 1.1 qt (1.1 L) of oil and replace oil fill cap/dipstick. 6. Dispose of used oil at an approved waste management facility. Operate the generator on level surfaces only. Inclined surfaces reduce the effective lubrication of the engine. Do not expose the generator to excessive moisture, dust, dirt, or corrosive vapors.
Controls and Features Read this owner’s manual before operating your generator. Familiarize yourself with the location and function of the controls and features. Save this manual for future reference. (19) (18) (1) (2) (17) (3) (4) (16) (5) (15) (7) (9) (14) NO. (13) DESCRIPTION (12) (8) (10) (11) Qty NO. (6) DESCRIPTION (7 Qty 1 AC CIRCUIT BREAKER 20A 1 11 OIL INDICATOR LIGHT ASSY 1 2 AC CIRCUIT BREAKER 30A 1 12 RECOIL STARTER 1 3 LUG GROUND 1 13 COCK ASSY.
Operation instruction of REDUCTOR ASSEMBLY (1) (2) (5) (6) IN OUT (7) (4) NO. 1 2 DESCRIPTION High‐pressure intake tube(1000mm) REDUCTOR ASSY (3) Qty NO.
2. Flip the generator back to its normal upright position. 3. Now you are ready to install the handle bars. HANDLE AND WHEEL KIT ASSEMBLY The wheel kit mist be assembled when there are no liquids in the generator. Foot 1. Place the generator on its side. (engine side down). 2. Secure the axle with two u bolts. 3. Screw on the nuts onto the u‐bolts to secure the axle. 4. Place the washer onto the axle. Bolt + Nut 1. Put the grips onto the handle bars. 2. Secure the bracket bolt and nut. 3.
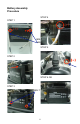
Battery Assembly Procedure STEP 4 STEP 1 (+) (+) (-) BOLT +NUT STEP 5 STEP 2 (-) B STEP 6 OK STEP 3 BOLT 8
STARTING THE UNIT Make sure all electrical devices are 60 Hz devices. Make certain the generator is on a flat, level surface. 2. Disconnect all electrical loads from the generator. Never start or stop the generator with electrical devices plugged in or turned on. Do not connect 50 Hz devices to the generator. Do not connect 3‐phase loads to the generator. Do not overload the generator.
·Unscrew the bolt from the air cleaner cover, and remove the air cleaner cover. ·Check the air cleaner element to be sure they are clean and in good condition. MAINTENANCE Generator maintenance consists of keeping the unit clean and dry. Be sure to store the unit in a clean and dry environment, where it will not be exposed to excessive dust, dirt, moisture or any corrosive vapors. Cooling slots should always be clean and free from clogs. Note: Do not use a garden hose to clean the generator.
TROUBLE SHOOTING Problem Generator will not start Generator will not start; Generator starts but runs roughly Generator shuts down during operation Generator cannot supply enough power or overheating No AC output Cause Solution No Propane New Tank Faulty spark plug Replace spark plug Unit loaded during start up Remove load from unit Low oil level Fill crankcase to the proper level Place generator on a flat, level surface Choke in the wrong position. Adjust choke.
WIRING DIAGRAM 12
Parts List NUMBER PART NUMBER DESCRIPTION QTY 1 E0001-190-00-LPG ENGINE ASSY (LPG) 1 2 3 4 5 6 7 8 9 10 11 12 13 14 15 16 17 18 19 33100-PG60-00 94101-06000-00 33710-L90-00 50310-PG60-00 82350-T80-00 77330-188-00 94050-10000-00 77320-188-00 31200-CST60-00 92101-05225-00 95701-10275-00 90486-10500-00 31170-188-00 31160-188-00 95701-06185-00 95701-05016-00 30300-190-00 31203-188-00 CONTROL PANEL ASSY WASHER,PLAIN 6MM CONNECT VALVE ASSY FRAME COMP IMMOBILITY BOARD BOTTOM RUBBER B NUT FLANGE M10 BOTT
20 21 22 23 24 25 26 27 28 29 30 16520-T80-00-PT369C 95701-06016-00 53136-T80-01 95701-06012-00 18350-TG50-00 18323-188-00 18382-188-00 18381-188-00 95701-08025-00 94111-08000-00 94045-08000-00 TANK COMP,FUEL(GREEN) BOLT,FLANGE M6X16 IMMOBILITY PIECE(RUBBER) BOLT,FLANGE 6 12 MUFFLER COMP LATEX (PROTR,IN MUFFLER) MUFFLER STAY GASKET,MUFFLER BOLT,FLANGE 8X25 WASHER,SPRING 8MM NUT 8MM 1 2 2 9 1 1 1 3 2 2 2 LIMITED WARRANTY Eastern Tools & Equipment, Inc.
About Your Product Warranty Eastern Tools & Equipment, Inc. welcomes warranty repair and apologizes to you for being inconvenienced. Any Authorized Service Dealer may perform warranty repairs. Most warranty repairs are handled routinely, but sometimes warranty service may be inappropriate. For example, warranty would not apply if an engine is damaged because of misuse, lack of routine maintenance, shipping, handling, warehousing and improper installation.
Warranty is available only through service dealers, which have been authorized by Eastern Tools & Equipment, Inc., please contact the place of purchase or Eastern Tools & Equipment, Inc. for a Service Dealer near you. CALIFORNIA & USEPA EMISSION CONTROL WARRANTY STATEMENT The U.S. Environmental Protection Agency (EPA), the California Air Resources Board (CARB) and Eastern Tools & Equipment, Inc. are pleased to explain the Federal and California Emission Control System Warranty on your small nonroad engine.
PRODUCT REGISTRATION For more efficient customer service, please fill out the information below and mail to Eastern Tools & Equipment, Inc. Product Warranty and Registration Division. Model Engine Serial Purchase Date No._________________ No.