
Installation & Assembly

7
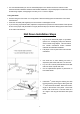
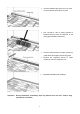
Use chalk line to trace starting line with ½”
expansion joint at the side and ¼” at row end.
Nail the guide planks along the starting line.
The plank will serve as a guide for the 1
st
row of
plank.
Width of the guide plank will be the same as the
width of the flooring you choose.
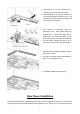
Use the trowel and apply adhesive at a 45°angle
from the starting line outward.
Install the first plank alone the guide strip with
tongue facing you and the groove facing the
starting wall.
Proceed from left to right to install other planks
in the rows.
Do small sections to ensure adhesive does not
dry before the planks are laid.
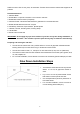
Use knocking block and pull bar to fasten the
joint.
Start subsequent row using the remainder of
the cut-off end plank from previous row. The
remainder should be at least 6”.
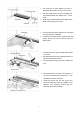
Insert the tongue end into the groove and
lower the plank as close as possible to the
adjacent one, avoiding contact with the
adhesive as much as possible.