
Installation & Assembly

4
It is recommended that you use non-tarred felt paper on the subfloor surface to reduce normal
mechanical friction between materials and facilitate installation. Lay the felt paper in the direction of the
boards using staples, overlapping the ends by 3" to 4". Drive in staples.
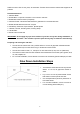
Using the Nailer:
Practice using the floor nailer on a scrap plank. Follow the safety tips and instructions of the nailer
manufacturer.
Clean the nail base plate regularly to ensure it does not damage the finish.
If you are using a pneumatic nailer, adjust the compressor air pressure for the hardness of the species
and to insure proper nail placement in tongue (about 80-90 psi). Follow the safety tips and instructions
of the nailer manufacturer.
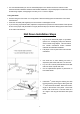
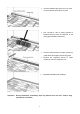
Nail Down Installation Steps
Lay 15 lb non-tarred felt paper or equivalent
(with 3” to 4” overlapping end) in the direction
of the boards using staples. This will reduce
the normal mechanical friction between
materials and facilitate installation.
Felt paper is not required if floor has acoustic
membrane.
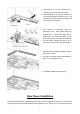
Use chalk line to trace starting line with ½”
expansion joint at the side and ¼” at row end.
Lay out 4 to 5 rows of planks ahead of time that
match in terms of joints and color.
Cut out imperfections planks or place them in less
visible areas
Use chalk line to trace starting line with ½”
expansion joint at the side and ¼” at row end.
Lay out 4 to 5 rows of planks ahead of time that
match in terms of joints and color.
Cut out imperfections planks or place them in
less visible areas
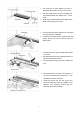
Install the 1
st
plank along the starting line with
the tongue facing out and grove facing the wall.
1
st
row must be hand-nailed. Drill holes at a 90
angle on the surface of the plank. Drive nails
head in with a nail driver. Then drill holes at a
45 angle in the tongue and fasten with spiral
nails.