
Installation & Assembly

3
Installation Work
Once ambient conditions are correct, bring the cases of floor planks to the installation site. Open a case
to check that product species, grade, color, size, and quality are correct. If all job-site conditions are in
order, set the un-opened cartons indoors and spread across subfloor. Once product is properly
acclimated, you may start installation. Open several cartons of flooring at the same time as this can let
you balance plank length, color and wood-grain variation in the wood, and ensure planks can be
arranged to reflect a homogenous floor covering.
Please advise your dealer immediately if any problems occur; our in-house installation team could be
contracted to take over the installation if required. To avoid any variation in internal wood moisture levels
before installation, avoid exposing the cases to rain or snow. Never store planks in unsuitable locations
such as a shed, unheated garage, or basement.
IMPORTANT: Prior to installing the floor, installer and homeowner must ensure that the
installation site and subfloor meet the conditions in this document. Installer and
homeowner are responsible for inspecting floor planks prior to installing them.
Depending on the type of installation, you may also need special moldings for
your floor such as nosing and reducer .
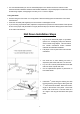
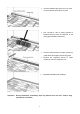
NAIL DOWN INSTALLATION
Nail installation is only used with PS-2 rated oriented strand board (OSB) or plywood subfloors.
Manufacturer recommends using 3/4" (18 mm) OSB or plywood on joists spaced no more than 19.2" (450
mm) apart, center-to-center. OSB or plywood must be structurally sound.
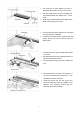
Recommended tools
1. Moisture Meter
2. Hardwood Flooring Cleat-Nailer (L-cleats only)
3. Chalk reel, Tape measure, Speed Square
4. Hammer, Pull bar, Knocking block, Floor Screws
5. Electric Drill and 3/32" bit
6. Finishing spiral nails, and nail set
7. Use non-tarred felt paper on subfloor surface to reduce normal mechanical friction, and a 6 mil. Poly
sheeting, if additional moisture protection is required.
8. Electric saw or Hand saw
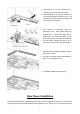
Preparing and Leveling the Subfloor:
The subfloor must be firmly fixed to the joists to avoid any panel movement that could cause creaking.
Use flooring screws if necessary to prevent creaking.
The subfloor surface must be level. The difference in level must not exceed 3/16" (5 mm) over a
distance of 6’ (1830 mm). Eliminate small surface irregularities with a sander or floor leveler.
The surface must be clean. Remove glue residue and staples, and drive in protruding nails.
Remove debris and dust with a broom or vacuum.