
User Guide


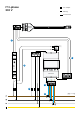


Menu button
Arrow buttons
Primary current screen
Secondary current screen
Distribution system screen
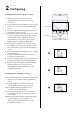
Configuring the current transformer ratio
1. Identify the current sensor ratio. This
is displayed on the current sensor (e.g.
300 A/ 5 A).
2. Press and hold the menu button on the power
meter for 3 seconds to enter programming
mode.
3. Press the right arrow button twice to access
the primary current screen.
4. Press and hold the menu button for 3 seconds
to enter edit mode. The digit on the left will
start to flash when in edit mode. Use the
arrow buttons to move the cursor. Use the
menu button to modify the digit value.
5. Set the primary value of the current sensor.
For example, in a 300:5 current sensor ratio,
300 is the primary value, and is displayed as
00300.
6. Press and hold the menu button for 3 seconds
to exit edit mode.
7. Press the right arrow button to access the
secondary current screen.
8. Set the secondary value of the current sensor.
Use the menu button to modify digit value.
9. Exit the edit mode by pressing and holding
the menu button for 3 seconds. Press
and hold the right-arrow button to exit
programming mode.
Configuring the distribution system
10. Press and hold the menu button on the power
meter for 3 seconds to enter programming
mode.
11. Press the right arrow button 6 times to
access the distribution system section.
12. Press and hold the menu button for 3
seconds to enter the settings.
13. Use the menu button to select an option.
For 3 phase TN, select 4-3Ph. For 3 phase IT,
select 3-3Ph.
14. Exit the edit mode by pressing and holding
the menu button for 3 seconds. Press
and hold the right-arrow button to exit
programming mode.
2 Configuring
Power meter
3
7
11