
- Ardisam Chainsaw User Manual

Check for parts online at www.getearthquake.com or call 800-345-6007 M-F 8-5 13
Operator's Manual
CS3814, CS3816, CS4116 Chainsaws
ASSEMBLY
The Earthquake Chainsaw carton includes the following
- Power Unit: Pre-assembled engine, handles, fuel tank,
oil tank, and chain brake handle.
- GuideBar:OregonDoubleGuard14”or16”,depending
on the saw model.
- SawChain: Oregon91P or 91VGS52(14”models)or
OregonS57(16”models)
- “Scwrench”Multi-tool:Combinationplug/barwrench
and screwdriver
- Bar Scabbard: Plastic guard that ts over the guide bar
and saw chain.
ASSEMBLING YOUR CHAINSAW
1. Carefully remove all items from the packaging. Place the
power unit on a at, stable work surface with the muer
facing to your right.
2. Pull back (toward the forward handle) on the brake lever to
ensure that the chain brake is disengaged.
3. Usingthe“Scwrench”multi-tool,loosenandremovethebar
nuts securing the clutch cover to the power unit. Set the clutch
cover aside. Tip: If working in the eld, place the bar nuts in
the clutch cover to keep from losing them in grass or foliage.
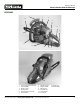
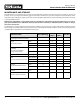
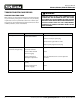
4. Remove the plastic shipping spacer from the bar studs. The
purpose of this spacer is to keep the clutch cover in the correct
position when the guide bar is not installed on the power unit.
SEE FIGURE 1.
5. Install the guide bar on the bar studs, and slide the bar back
until it comes into contact with the drive sprocket.
6. Carefully remove the saw chain from its package. Stretch the
chain out into a long horizontal loop. The cutting teeth on
the top length of chain should face away from the power
unit. The cutting teeth on the bottom length of the chain
should face toward the power unit. Protective gloves should
be used when handling the chain.
7. Wrap the chain around the drive sprocket rst, and lay the
drive links of the chain into the groove along the outer
perimeter of the guide bar. Lay the chain over the nose (tip)
of the guide bar.
8. Slide the bar forward until the bar mates with the tensioning
tab. Make sure that the drive links of the chain are seated
within the groove around the perimeter of the bar. If the bar
will not slide forward far enough, use the screwdriver end of
the Scwrench to turn the tension screw counter-clockwise.
The tension screw is located on the front of the power unit,
next to the guide bar.
9. Replace the clutch cover over the bar, and turn the bar nuts
onto the bar studs. Only nger tighten the bar nuts at this step.
10. Locate the tension screw on the front of the power unit next
to the guide bar. Use the Scwrench to turn the tension screw
clockwise. This will take the slack out of the saw chain. When
properly tensioned, two conditions must be met:
•Thechainshouldnothangordroopawayfromtheguide
bar.
•Youshouldbeabletopullthechainslightlyawayfrom
the guide bar, but not so far as to be able to disengage the
drive links from the groove around the perimeter of the bar.
11. Pull up on the guide bar’s nose and use the Scwrench to tighten
the bar nuts. Check that the chain spins freely around the bar
by hand. If there is resistance, the chain may be too tight.
12. Place the bar scabbard over the guide bar and saw chain. This
guard will help to protect the user from the sharp cutting
teeth as well as help keep the cutting teeth sharp when the
saw is not in use.
13. Check the tension of the saw chain frequently during use,
especially during the rst two hours of use on a new chain.
Re-tension as needed.
14. Always release the tension in the chain after nishing work
and before the saw chain and guide bar cool completely. As
the saw chain heats up during operation, it will expand and
stretch, requiring re-tensioning on occasion. As the saw cools
down the saw chain will shrink, and if left tensioned, could
cause severe and permanent damage to the guide bar or the
power unit’s drive components.
WARNING
FAILURE TO PROPERLY TENSION THE CHAIN COULD
RESULT IN DAMAGE TO THE UNIT OR SEVERE INJURY
OR DEATH. OVER TENSIONING COULD CAUSE DAMAGE
TO THE SAW’S POWER UNIT OR GUIDE BAR. LACK OF
TENSION COULD CAUSE THE CHAIN TO DISENGAGE
THE BAR COMPLETELY, ALLOWING IT TO WHIP BACK
WHERE IT COULD CONTACT THE OPERATOR CAUSING
SEVERE INJURY OR DEATH.
Figure 1