
User Manual

USER GUIDE
95
with distance or altitude), or a low alarm (alarm will trigger if the readout’s value is below the alarm threshold,
such as with voltages). Then, set the item accordingly.
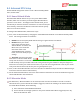
Alarm Trigger Threshold: This item lets you set the point at which the alarm will trigger for the readout (see
above).
Alarm Msg: This item lets you program a custom text message that will appear in the notification area when
the alarm for this readout (if set) is triggered. See the “Onscreen label” item above for instructions on how to
use the sticks to edit the message.
Switch to Screen if Alarm?: If you have set up multiple screens of readouts, setting this item to “Yes” will
cause the OSD to switch to the screen containing this readout, when an alarm for it is triggered.
Display Readout's Units?: If this item is set to “Yes”, the units of the readout (if any) will be displayed to the
right of the readout.
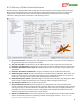
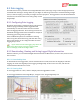
8.2.2 Gauges and Swatches
Most of the numeric readouts can be displayed in gauge and swatch format, as
well as numeric format.
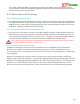
Gauge format – In this mode, the readout can be displayed in bar graph format,
with up to 5 colors indicating the present status of the readout’s value.
Swatch format – In this mode, the readout is a simple colored square, with
programmable color changes, letting you easily see when readout needs your
attention. You can also display the numeric value of the readout next to the
swatch, if desired.
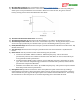
8.2.2.1 Gauge and Swatch Colors and Thresholds
The reading and color of a gauge (and the color of a swatch) is programmed by
selecting the numeric thresholds for which a color change will occur, and
selecting the total number of colors to choose from. For example, if you wanted
a gauge that reads empty, and is red, when a readout reaches “10” or below, and
that reads full, and is green, when the value reaches 20 or higher, you would set the number of colors to be 2,
and you would set a threshold where you wanted the color change
to occur (presumably 15, the midway point between the range of
the readings).
8.2.2.2 Configuring Gauges and Swatches
To configure a readout as a gauge or swatch, first select the readout
in the Advanced Numeric Readouts menu as described above, and
select the type of display desired for that readout in the “Display
parameter as” item. Then, navigate to the “Set Up Gauge/Swatch”
menu.
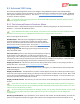
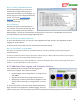
8.2.2.3 The Gauge/Swatch Setup Menu
This menu lets you set up the colors and thresholds for a gauge or swatch readout.
Readout Name: This item indicates the readout being changed.
Number of Colors in Gauge: This item lets you select the number of colors that will be used for the gauge or
swatch. The range is from 2 to 5. Here are the colors that will display if you select 5 colors: