
User Manual

USER GUIDE
45
6.7 Accepting the Airframe Type
For safety, when you select the airframe type via the Stick Menus, the
MicroVector will ask you to confirm the newly selected airframe type on
the next boot-up after you change it, but only after USB is disconnected.
The MicroVector’s outputs will not be turned on until you OK the
airframe type.
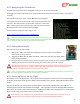
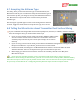
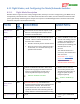
The message at right will appear on the screen during boot for about 30
seconds. Toggle the mode switch to accept the new type, if it’s correct.
6.8 Telling the MicroVector about Transmitter Dual Surface Mixing
If your traditional fixed wing model has dual ailerons/flaperons, elevators, or rudders, and the transmitter
does the mixing for these, you need to follow these steps:
If you are using parallel receiver mode (not satellite, SPPM or S.BUS™) make
sure the “Aux In” receiver harness connector is connected to the correct
secondary output channel of your receiver (for example, the 2
nd
aileron
channel)
If you are using a serial receiver mode, you should have enabled this mixing before running the Serial
Rx Input Learn Wizard. If you did not, you’ll need to rerun that wizard.
Invoke menu mode, and change the “Tx Mixed Dual Contrl Surfaces” menu item under the “New
Airframe Checklist” menu to correspond to the type of second channel you have.
Before flying, you will need to connect the servo for the secondary channel to the "M5/Aux1”
MicroVector output.
If you have two secondary channels, such as two ailerons and two elevators, and you want your
transmitter to do the mixing on both channels, you must use a serial receiver mode (satellite, SPPM or S.BUS™)
since there is only one “Aux In” input in parallel receiver mode. You can select the correct inputs and outputs
for your setup as described in the “Configuring Auxiliary Receiver Inputs and Servo Outputs” below.