
User Manual

USER GUIDE
41
6.5 Configuring the MicroVector via Stick Menus or InfoPanel
This section describes configuring the MicroVector using the OSD stick menus (or the InfoPanel). This section
assumes you have already configured your RC transmitter and bound it to your receiver, and connected your
receiver and video display to the MicroVector, as these steps are required to do stick menu configuration.
You do not need a camera or video transmitter to configure the MicroVector with the stick menus. You
can directly connect the “composite” input of your video monitor or goggles to the "Vid Tx” output of the
MicroVector Video Harness, and configure without a camera.
All of the steps below can also be completed using the software, if desired.
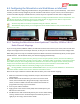
The InfoPanel display allows you to navigate the menus without video or a PC, but menu items are
shown one at a time.
6.5.1 Teaching the MicroVector about Spektrum™ Satellite, SPPM or S.BUS™
Radio Channel Mappings
If you are using satellite, SPPM or S.BUS™, the MicroVector must first learn how your sticks, switches and other
outputs are mapped to the serial output channels, so that you can control the menus for further configuration.
When doing onscreen setup, the “Serial Rx Input Learn Wizard” should run automatically when you first power
the MicroVector. The wizard will learn your channel mappings automatically.
The MicroVector expects the four primary receiver outputs (throttle, aileron, elevator and rudder) to
be assigned to serial channels 1 through 4 (in any order). All known radios use channels 1-4 for these outputs.
If for some reason you have configured your transmitter to use channel 5 or higher for one of these primary
outputs, those channels will not be detected by the wizard, and you will need to use the Radio Control
Configuration tab of the software to manually configure your serial channels.
If using S.BUS2™ with the Futaba™ RX R7008SB receiver, be sure you select FASTTtest™ 18 channel or
14 channel modes and link to the receiver from the transmitter’s menu.
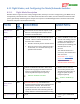
Here are the steps to follow to teach the MicroVector about your serial channel mapping:
1. Make sure transmitter mixing is disabled, except as described in the
section above.
2. Decide which knobs and switches you want to use for the mode
switch, the submode switch, the gain knob, flaps, and/or the kill
switch, as desired. Make sure that these knobs and switches are
programmed correctly in your transmitter.
3. Turn on your radio transmitter.
4. Apply power to the Current Sensor/PSU, which should power your
MicroVector and receiver.
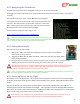
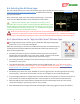
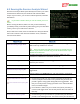
5. The MicroVector will automatically detect your receiver mode during
startup, and will run the “Serial Rx Input Learn Wizard” (shown at
right) if you are using a serial receiver mode.