
User Manual


USER GUIDE
38
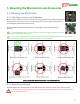
6 Configuring the MicroVector
6.1 Configuration Overview
The MicroVector can be completely configured using either the onscreen (stick) menus, the optional InfoPanel
display, or the Vector Windows Software (the software). At a high level, configuration consists of these steps:
Configuring your radio to work with the MicroVector
Teaching the MicroVector about your radio’s serial channel mapping, if you are using the satellite,
SPPM or S.BUS™ receiver protocol
Selecting the airframe type (airframe type must be confirmed with Mode switch after rebooting)
Teaching the MicroVector about your receiver connections, radio stick directions and throws
Rezeroing gyros, and recording flat level mounting
Programming the Mode/Submode switches for selecting the desired flight modes
Configuring the flight controller/stabilizer
Tuning, as needed. See section 8.1 - ‘Getting the Most out of your High Performance Mini Quad’ for
Mini Quad tuning.
Optional: Configuring Return to Home and other Safety settings
Optional: Configuring the OSD to display what you want to see
Optional: Configuring and calibrating the compass
Optional: Configuring the EagleEyes™ FPV Station, if used
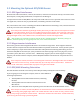
6.2 Using the Automatic On-screen Setup Wizards
After you have set up your hardware correctly, the on-screen setup wizards should automatically run, under
these conditions:
You have not configured the MicroVector before, or you’ve done a factory reset
You are using a serial receiver mode (satellite, SPPM, or S.BUS
TM
)
Your radio is turned on and bound to your receiver
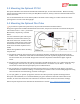
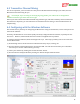
If the above are true, when you power up the MicroVector
(without USB connected) the following onscreen setup steps
should automatically start:
The “Serial Rx Input Learn Wizard” should start, during
which the MicroVector learns how you have your serial
radio channels mapped
Next, the Airframe type selection menu should
automatically run
Finally, the “Receiver Analysis Wizard” should run
automatically
Each of the above steps is documented later in the manual.
A video demonstrating this process (on a micro racing quad) is available here:
https://www.youtube.com/watch?v=jIH2UHtT0pA