
User Manual

USER GUIDE
16
3 Hooking Up the MicroVector
This section describes the MicroVector’s cabling and connections, and how to connect the MicroVector to your
RC receiver, your servos or ESCs, and your FPV video transmitter
and camera.
3.1 MicroVector Controller Connections
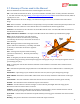
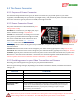
3.1.1 Connection Overview
The figure at right shows all the possible connections to the
MicroVector.
There are 3 types of connectors used on the MicroVector:
JST “SH”: ESC/Servo, Rx In, UART, Video, and Power connectors.
JST “ZH”: Bus and Sat connectors
Micro USB: USB connector
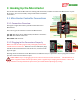
3.1.2 Plugging in the Connectors Properly
Make sure that the cable plugs are fully and tightly inserted into
the MicroVector connectors. When the case is installed, the plugs
should be almost flush with the sides of the case, as shown in the
figure at right.
Although all the connections on the MicroVector are different sizes, it is possible to insert a plug that has fewer
pins into a connector that has more pins.
MAKE SURE that you are plugging the correct wire harnesses into the connectors. The MicroVector or
other equipment could be destroyed when power is applied if you misplug the connectors! Never “hot
plug” connectors! Always disconnect power from your model before adjusting any wiring!