
User Manual


Copyright 2012 Eagle Tree Systems, LLC Page 10
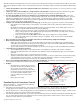
Figure 11: Overall Gain vs. Stick
Position within Center Stick Box
configured through the Radio Stick Menu.
Entering the Radio Stick Menu
Entering the Radio Stick Menu is done by powering the model with the Guardian connected and quickly toggling the Mode/Config
Switch back and forth four times within the first 15 seconds following power-on. One second after the last switch movement, the menu
will be invoked.
You will know that the menu has been invoked when the servos of your model stop their normal stabilization deflections and instead
perform a short twitch followed by no further movement. Also, the status LED will blink in a two blink sequence when the menu is
active.
Menu Navigation
Once in the menu, you will start at menu item #1 in the List of Features and Options section below. The menu items can be navigated by
deflecting the Aileron and Elevator control inputs (your control stick). On a controller where moving the stick to the right and pulling it
back results in negative servo deflections (servo pulse width is shortened), flicking the Aileron input to the right will increase the menu
item number currently being edited, while flicking the Elevator input forward increases the option value for the currently selected item in
the menu.
Menu feedback is reported through the Aileron and Elevator servo outputs, as shown in Figure 10. Each time a new menu item is selected
by flicking the Aileron control, the Aileron servo will “twitch” once, delay 1.5 seconds and then twitch rapidly a number of times that
corresponds to the current menu item number selected. After this, the Elevator servo will count up to the current option value number
selected for that menu item. If a new option value is chosen by flicking the Elevator stick, the Elevator servo output only will twitch once
each time the value is changed, wait 1.5 seconds and then count up to the selected option value number.
Note: If you have your Aileron or Elevator directions reversed on your transmitter, then they will also be reversed as you navigate
the menu!
Note: If you have reduced the rates/deflection ranges configured on your transmitter for your servos, ensure that they are
deflecting at least 50% in order for the menu to detect their movements.
Exiting the Menu
To exit the menu, saving the settings that were changed, quickly toggle the Mode/Config switch back and forth once. (up-down or down-
up) Once out of the menu, normal servo deflections will start again, using the new settings.
To exit the menu without saving your changes, simply disconnect the receiver battery and repower the plane. The Guardian will boot up
again with its previous settings.
Menu Example
Let’s say you want to set the 2D Heading Hold Gain (menu option 5) to a value of 6. First, toggle the Mode/Config switch 4 times, to
enter menu mode, which starts at menu option 1. Then, you will flick the Aileron stick to the right (or left, if your ailerons are reversed) 4
times, to reach menu option 5. Then, your Aileron should twitch 5 times, to indicate that menu option 5 is selected. And, your Elevator
will twitch a number of times, indicating the present setting for the 2D Heading Hold Gain. Then, flick your Elevator stick up or down, to
increase or decrease the 2D Heading Hold Gain setting, until it reaches 6. At this point, the Elevator should twitch 6 times, which is the
desired setting. To save the new setting, toggle the Mode/Config switch once, which exits menu mode, and returns servo control.
List of Menu Features and Options
The following is an ordered list of all the options adjustable in the Guardian’s Radio Stick Menu, and from the PC software. Note that
options 14 and higher are available only via the PC software.
1. Model Control Type
Enables internal mixing if needed. The Guardian expects only an unmixed servo control signal from the Rx.
1: Standard – Dual ailerons / flaperons are supported.
2: Elevon – The Guardian does the elevon mixing internally. Dual Aileron / Flaperon support
is not available.
3: V-Tail – The Rudder and Elevator channels are mixed internally. Dual ailerons / flaperons
are supported.
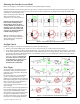
2. Center Stick Stabilize Only Mode
This feature is primarily for those who don’t have the Mode/Config switch connected, but want
the benefits of 2D mode while also being able to perform acrobatics. Maximum 2D Mode
stabilization is active when the control stick is centered, and as the control stick is moved from
center, the Overall Stabilization Gain reduces proportionally as illustrated in Figure 11. (2D
Mode Only)
Radio Stick Menu Options: 1: Off; 2: On
3. Center Stick Box Size
The maximum deflection of the control stick before stabilization is fully disabled in Center
Stick Only mode. The stabilization gain will decrease proportionally with the deflection of the