
Manual
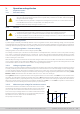

Table Of Contents
- 1. General
- 1.1 About this document
- 1.2 Warranty
- 1.3 Limitation of liability
- 1.4 Disposal of equipment
- 1.5 Product key
- 1.6 Intended usage
- 1.7 Safety
- 1.8 Technical Data
- 1.9 Construction and function
- 1.9.1 General description
- 1.9.2 Block diagram
- 1.9.3 Scope of delivery
- 1.9.4 Accessories
- 1.9.5 Options
- 1.9.6 The control panel (HMI)
- 1.9.7 USB port (rear side)
- 1.9.8 Interface module slot
- 1.9.9 Analog interface
- 1.9.10 “Share BUS” connector
- 1.9.11 “Sense” connector (remote sensing)
- 1.9.12 Master-Slave bus
- 1.9.13 Ethernet port
- 2. Installation & commissioning
- 2.1 Transport and storage
- 2.2 Unpacking and visual check
- 2.3 Installation
- 2.3.1 Safety procedures before installation and use
- 2.3.2 Preparation
- 2.3.3 Installing the device
- 2.3.4 Connection to AC supply
- 2.3.5 Connection to DC sources
- 2.3.6 Connection of remote sensing
- 2.3.7 Grounding of the DC terminal
- 2.3.8 Installation of an interface module
- 2.3.9 Connection of the analog interface
- 2.3.10 Connection of the Share bus
- 2.3.11 Connection of the USB port (rear side)
- 2.3.12 Initial commission
- 2.3.13 Commission after a firmware update or a long period of non-use
- 3. Operation and application
- 3.1 Important notes
- 3.2 Operating modes
- 3.3 Alarm conditions
- 3.4 Manual operation
- 3.5 Remote control
- 3.6 Alarms and monitoring
- 3.7 Locking the control panel (HMI)
- 3.8 Locking the adjustment limits and user profiles
- 3.9 Loading and saving user profiles
- 3.10 The function generator
- 3.10.1 Introduction
- 3.10.2 General
- 3.10.3 Method of operation
- 3.10.4 Manual operation
- 3.10.5 Sine wave function
- 3.10.6 Triangular function
- 3.10.7 Rectangular function
- 3.10.8 Trapezoidal function
- 3.10.9 DIN 40839 function
- 3.10.10 Arbitrary function
- 3.10.11 Ramp function
- 3.10.12 IU table function (XY table)
- 3.10.13 Battery test function
- 3.10.14 MPP tracking function
- 3.10.15 Remote control of the function generator
- 3.11 Other applications
- 4. Service and maintenance
- 5. Contact and support

© EA Elektro-Automatik in 2022, this information is subject to change without notice 3833200840_manual_elr_10000_2u_3kw_en_02
3.3 Alarm conditions
This section only gives an overview about device alarms. What to do in case your device indicates an
alarm condition is described in section “3.6. Alarms and monitoring”.
As a basic principle, all alarm conditions are signaled optically (text + message in the display) and acoustically (if activated), as
well as status via digital interface. In addition, the alarms are reported as signals on the analog interface. For later acquisition,
an alarm counter can also be shown on display or read via digital interface.
3.3.1 Power Fail
Power Fail (PF) indicates an alarm condition which may have various causes:
• AC input voltage too low (mains undervoltage, mains failure)
• Defect in the input circuit (PFC)
• One or multiple power stages in the device are faulty
As soon as a power fail occurs, the device will stop to supply or sink power and switch off the DC input. In case the power fail
was an undervoltage and is gone later on, the device can continue to work as before, but this depends on a parameter in the
settings menu called DC input -> State after PF alarm. The default setting would keep the DC input switched off, but leave
the alarm in the display for notication.
Powering the device down (power switch) can’t be distinguished from a supply blackout and thus the
device will signalize a PF alarm every time it’s switched off. This can be ignored.
3.3.2 Overtemperature
An overtemperature alarm can occur from an excess temperature inside the device and temporarily causes it to switch of the
power stage(s). This is usually due to the ambient temperature exceeding the specied operating temperature range of the
device. After cooling down, the device can automatically switch the DC input back on, depending on the setting of parameter
DC input -> State after OT alarm. Also see section
3.4.3.1
for more information. The alarm will remain in the display as no-
tication and can be cleared anytime.
3.3.3 Overvoltage protection
An overvoltage alarm (OVP) will switch off the DC power stage and can occur if:
• the connected voltage source provides a higher voltage to the DC input than set in the overvoltage alarm thresholds (OVP,
0...110% UNOM)
This function serves to warn the user acoustically or optically that the device probably has experienced an excessive voltage
which could damage it.
The device isn’t tted with protection from external overvoltage and could even be damaged when not
powered
3.3.4 Overcurrent protection
An overcurrent alarm (OCP) will switch off the DC power stage and can occur if:
• the current in the DC input reaches the adjusted OCP limit.
This function serves to protect the connected external source so it’s not overloaded and possibly damaged due to an exces-
sive current.
3.3.5 Overpower protection
An overpower alarm (OPP) will switch off the DC input and can occur if:
• the product of the voltage and current in the DC input reaches the adjusted OPP limit.
This function serves to protect the connected external source so it’s not overloaded and possibly damaged due to an exces-
sive power.