
Specifications


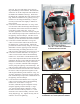


g) Locate the green coded cable that is 27” long
and connect one end of this cable to the electric
buss bar marked “M-” on the controller. Tighten
the provided nut and bolt securely using 1/2”
wrenches. Remember to use the opposing wrench
technique and avoid twisting or bending the
buss bar. Using a 1/2” wrench and the factory
hardware, connect the other end of this cable
to position “A” of the forward/reverse switch
assembly, as shown on the wiring diagram (pg. 12).
Tighten securely, but use caution to avoid over
tightening.
h) Locate the orange coded cable that is 45” long
and connect one end of the cable to the threaded
lug marked “S1” on the motor. Using 1/2”
wrenches, install the top nut and tighten securely,
remembering to use the opposing wrench
technique. Using a 1/2” wrench and the factory
hardware, connect the other end of this cable
to position “D” of the forward/reverse switch
assembly, as shown in the wiring diagram (pg.
12). Tighten securely, but use caution to avoid
over tightening.
i) Locate the white coded cable that is 41” long and
connect one end of this cable to the threaded
lug marked “S2” on the motor. Using 1/2”
wrenches, install the top nut and tighten securely,
remembering to use the opposing wrench
technique. Using a 1/2” wrench and the factory
hardware, connect the other end of this cable
to position “B” of the forward/reverse switch
assembly, as shown in the wiring diagram (pg.
12). Tighten securely, but use caution to avoid
over tightening.
j) Locate the black coded cable that is 36” long and
connect one end of this cable to the electric buss
bar marked “B-” on the controller, as shown in the
wiring diagram (pg. 7). Tighten the provided nut
and bolt securely using 1/2” wrenches. Remember
to use the opposing wrench technique and avoid
twisting or bending the buss bar. The other end of
this cable will be connected to the negative terminal
of battery #6 after the batteries have been installed.
12) BATTERY INSTALLATION:
Before installing the batteries, there are a few steps
you should take to ensure optimal performance from
your new STQ EZ9 2001 Performance Enhancement
Kit. Begin by giving your batteries a thorough
cleaning. Dirt can be removed with a scrub brush
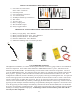
11g & j. Green and Black Cable
Installation on Controller
11i. White Cable Installation on
Forward/Reverse Switch
11. Cable Installation on Solenoid, Con-
troller and Forward/Reverse Switch
A
B
C
D
8