
Specifications


8) COMPONENT INSTALLATION PREPARATION:
Before installing our Performance Enhancement Kit
in your cart, take a little time to clean the areas now
exposed by the removed components. The motor
mount may have some grit or dirt around the opening
of the mount. A moist rag or small brush can be used to
clean that area. Avoid letting dirt fall into the housing.
The battery trays may have dirt, leaves, or corrosion,
which should be cleaned. For instruction on cleaning
corrosion, see step 12. While the mounting surface of
the controller should be quite clean, inspect it and wipe
it down with a damp cloth to remove dirt or film. This
area acts as a heat sink and dirt will interfere with its
performance.
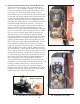
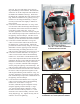
9) MOTOR INSTALLATION:
Before mounting the motor, lubricate the splines, but
not the end of the motor shaft with quality heavy-weight
grease… available at any auto parts store. Lifting the
new motor up, slide it onto the shaft inside the motor
mount housing. With some gentle back and forth
movement and pressure toward the housing, the motor
should mount up to the housing with little effort. Align
the mounting holes of the housing and the mounting holes
of the motor by rotating the motor slightly. When aligned
properly, the threaded electrical lugs of the new motor
will be on bottom and the mounting bolts can be inserted.
Don’t forget to reinstall your cable-retaining loop, if your
cart has one. Observe a rotating or crisscross pattern as
you tighten the mounting bolts, to ensure that the motor
is not binding or stressed. Tighten securely… but avoid
over tightening.
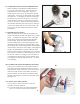
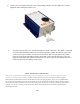
10) CONTROLLER AND SOLENOID INSTALLATION:
In the kit you will find a new solenoid that mounts on
back of the controller. Install the diode across the two
small terminals. Install the resistor across the two large
terminals. Install the fuse on the number one battery
positive teminal. After all cables are installed connect
the main soleniod positive cable to the open end of the
fuse Figure 10.
11) CONNECTING THE CABLES:
It is now time to connect the cables to your new
controller, solenoid, and motor.
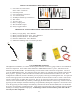
a) Locate the small resistor wire from the hardware
pack. It is a short wire with a ring terminal on
8. Clean the Motor Mount Area
9. Motor Installed
6
10.