
Specifications


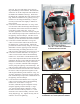


4) SPEED CONTROLLER AND SOLENOID REMOVAL:
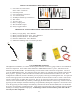
Directly below the passenger’s seat you will find a black
plastic cover… this is called the controller cover. The cover
is secured using four hex head machine bolts. Remove these
bolts using a 3/8” socket with the appropriate extension.
Underneath the cover you will notice the speed controller and
the solenoid. The speed controller is the small metal box and
the solenoid is the cylindrical device mounted on top of the
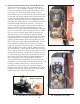
controller. Begin the removal of these components by first
discharging the speed controller. Using a standard screwdriver
bridge the terminals marked “B-” and “B+”. You may see
or hear a small spark and this is normal, and is an indicator
that the capacitors inside the speed controller have been
discharged. Let’s begin with the SOLENOID (the cylindrical
device). You will notice it has two large lugs and two smaller
lugs. You will be replacing all the cables on the large lugs
with cables from our new Performance Enhancement Kit,
but the wires attached to each of the smaller lugs will be kept
and reattached to the new solenoid. Don’t forget to use the
opposing wrench technique when removing these wires and
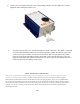
cables. Moving on to the SPEED CONTROLLER. You will
notice it has three large flat buss bars and one 6-pin Molex
connector. The Molex connector may have a small tab which
needs to be depressed in order to pull the connector from the
speed controller (4c). Do not pull the Molex connector by the
wires… grip the body of the connector and wiggle it back and
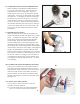
forth as you pull outward. Just like on the solenoid, you will
be replacing the large cables on the speed controller with new
cables from our STQ EZ9 2001 Performance Enhancement
Kit, but the smaller wires in the 6-pin Molex connector
will be retained and reinstalled on the new speed controller.
Remember to use the opposing wrench technique, and to avoid
twisting or bending of the buss bars. Once all of the wires
and cables have been disconnected, release the mounting
hardware of the controller and the solenoid and remove those
components from the cart. Retain the 3 metric bolts, which
hold the controller, as they will be used later.
Controller
Cover
4a. Controller Cover (On)
4b. Controller Cover (Off)
4c. 6-Pin Molex Connector Removal
Solenoid
Controller
Molex Connector
4