
Specifications


INSTALLATION
Before beginning lay out all the parts in an organized manner, this will
make the install much easier.
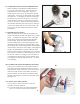
CAUTION: Disconnect the main positive and negative
battery connections. Wear the appropriate eye
protection and be aware that the high voltage system
you are working with can cause severe burns, be
very careful to not short out any tools on the battery
connections.
1) Remove all motor circuit cable from the Forward and Reverse
switch assembly. Then remove the smaller activation circuit leads.
Make note of each wire location so that it can be returned to it’s
original location.
2) Remove the switch assembly from the cart. Then remove the nut
securing the center shaft, using a 9/16” wrench.
3) Slide the center shaft out of the F&R switch, and remove the moving
cam assembly. Note the position stop tab for reassembly.
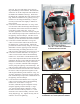
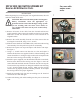
4. Remove the square cam stops and replace with the hex cam stops.
See figure 1
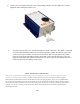
5. Using a ½” wrench remove one buss bar at a time and replace it
with the thicker brass one supplied in the kit. When installing, each
contact should be at a 45 degree angle to the buss bar. Replace both
buss bars on the moving cam assembly. See figure 2
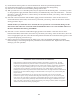
6) Install the spacer supplied, onto the threaded end of the center shaft,
then insert the shaft into the moving cam. See figure 3. Place the
center shaft and cam back onto the switch. Be sure the cam stop tab
is between the stops which were changed. Install the nut and using
a 9/16” wrench tighten the nut securely. Make sure the moving
contacts line up properly with the stationary contacts. If not adjust
the moving contacts for proper alignment.
7) Install the assembly back into the cart making sure all electrical
connections are clean and tight.
8) Connect the battery pack cables making sure they too are clean and
tight.
SCP EZ BRS F&R SWITCH UPGRADE KIT
Used on EZ-GO Electric Carts
1108
Figure 1 - Replace Stop
Figure 2 - Replace Buss Bars
Figure 3 - Install Spacer
12