
Specifications


f)
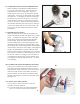
FINAL INSPECTION AND TESTING
At this time you should take a moment and review your installation and make sure that all cables have been
connected to the appropriate terminal. Look for a loose connection, which you may have failed to tighten.
Ensure that all of the smaller wires have been returned to their original locations. Once you are confident that
all of your work is sound, reinstall the seat assembly on the cart to begin the testing procedure. Testing should
only be done outside with at least 30 feet in front of and in back of the cart. If you have installed your kit inside
a garage, you will have to push (not drive) the cart outside where ample space is available and perform the
following procedures:
10
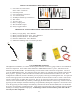
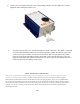
Connect the six pin Molex connector to the corresponding controller five pins. Make sure of proper
alignment while pushing the connector on.
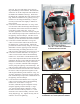
g) Tech Tip: notice in figure 11a a component marked as “diode connection”. This diode is connected
across the small solenoid terminals. It is of utmost importance to make the small activation wires
connect to the proper terminals. For the correct connection make sure you connect the positive
input wire to the diode end marked with the white band. Connect the black negative wire to the
diode end without the white band. This diode must be in place to protect the controller. Failure to
install correctly will cause damage to the system.