Router R130g Broadband Router Quick Setup Guide V1.
Table of Contents TABLE OF CONTENTS ................................................................................................................................ 2 CHAPTER 1 NAVI R130G’S ROUTER MODE QUICK SETUP ................................................... 5 1.1 ROUTER MODE’S QUICK SETUP INSTRUCTION ....................................................................... 5 1.2 THE INTRODUCTION OF ROUTER MODE’S QUICK SETUP ...................................................... 7 1.2.
FCC Regulation and Rules This equipment has been tested and found to comply with the limits for a Class B digital device, pursuant to part 15 of the FCC Rules. These limits are designed to provide reasonable protection against harmful interference in a residential installation. This equipment generates uses and can radiate radio frequency energy and, if not installed and used in accordance with the instructions, may cause harmful interference to radio communications.
§ 2.1077 Compliance information. (a) If a product must be tested and authorized under a Declaration of Conformity, a compliance information statement shall be supplied with the product at the time of marketing or importation, containing the following information: (1) Identification of the product, e.g., name and model number; (2) A statement, similar to that contained in § 15.
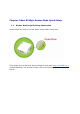
Chapter 1 Navi R130g’s Router Mode Quick Setup 1.1 Router Mode’s Quick Setup Instruction Please switch the slide to “Router Mode” as the below instruction: Then please open a Microsoft Internet Explorer, and enter http://192.168.100.
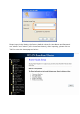
Please input in the blanks, the factory default values for User Name and Password are “admin” and “admin” (all in lowercase letters); after inputting, please click on “OK” to enter the homepage as below:
1.
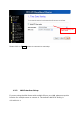
1.2.1 Time Zone Setting The section provides to change the Time. However, change the router’s date and time does not affect the date and time on your PCs.
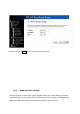
Please select your time Zone Please click on “Next” button to connect to next step. 1.2.2 LAN Interface Setup If you are using the Mini Router with multiple PCs on your LAN, please set up this function for multiple users to connect it. The default LAN IP for R130g is 192.168.100.1.
Please click on “Next” button to connect to next step. 1.2.3 WAN Interface Setup R130g supports 4 connection types to WAN, select one of the WAN connection modes required by your ISP in below “WAN Access Type” page, the WAN setting pages will differ depending on what kind of WAN Type you select.
Please click on “Next” button to connect to next step. 1.2.3.1 WAN Interface Setup–Static IP Choose Static IP Address if all WAN IP information is provided to you by your ISP. R330g will not accept the IP address if it is not in this format, and the blanks of “IP Address”, “Subnet Mask” and “Default Gateway” must be input.
Input the data provided by ISP Input the data provided by ISP Input the data provided by ISP DNS also needs to be inputted, ,otherwise you can use the domain name. Please click on “Next” button to connect to next step. 1.2.3.2 WAN Interface Setup– DHCP Client Choose DHCP Client to obtain IP address information automatically from your ISP. Select this option if your ISP does not give you any IP numbers to use.
Please click on “Next” button to connect to next step. 1.2.3.3 WAN Interface Setup– PPPoE If your ISP uses PPPoE connection, your ISP will provide you with a username and password.
Please click on “Next” button to connect to next step. 1.2.3.4 WAN Interface Setup– PPTP Some DSL service providers supply a special DSL modem in Europe or Big Pond Cable in Australia.
which provided by your ISP. IP Address, Server IP Address and Subnet Mask are all input as necessary. Please click on “Next” button to connect to next step.
1.2.4 Wireless Basic Settings The first step of setting up the “Wireless Basic Settings” is to give a name for SSID, herewith the default name of SSID is Navi_R130g, it’s suggested to use. Select the suitable item for you to use. It’s suggested to use. Please click on “Next” button to connect to next step.
1.2.5 Wireless Security Setup The “Encryption” item of “Wireless Security Setup” is optional; which means you can choose it under your demand, herewith it’s divided into two categories of “WEP” and “WPA”, if you want to protect your transmitting data; you can select it depended on the level of your request. Please follow the instruction below to complete “Wireless Security Setup”. It’s an optional item. a.
It has low level (64-bit) and high level (128-bit). It has “10 characters” and “26 characters”; it will be listed under your selection is low level (64-bit) or high level (128-bit). No matter if you selection is either 10 or 26 hexadecimal digits (0~9, a~f, and A~F) in the pull-down menu bar of “Key Format”; it will be based on whether you select 64-bits or 128-bits in the “Key Length” pull-down menu.
Please select it under your demand Select it by your request Please input it as necessary After setting up, please click on Finished” button to connect to next step.
1.2.6 Quick Setup Finish The Quick Setup has been completed successfully when you see this screen. The system will be rebooting automatically and goes to the Product’s Diagram Homepage after 60 seconds.
Chapter 2 AP Mode’s Quick Setup 2.1 AP mode’s Configuration Please switch the slide to “AP Mode” as the below instruction: Then please open a Microsoft Internet Explorer, and enter http://192.168.100.
2.
2.2.1 Time Zone Setting The section provides to change the Time. However, change the router’s date and time does not affect the date and time on your PCs. Please select your time Zone Please click on “Next” button to connect to next step.
2.2.2 LAN Interface Setup If you are using the Mini Router with multiple PCs on your LAN, please set up this function for multiple users to connect it. The default LAN IP for R130g is 192.168.100.1. The default data is suggested to use. Please click on “Next” button to connect to next step.
2.2.3 Wireless Basic Settings The first step of setting up the “Wireless Basic Settings” is to give a name for SSID, herewith the default name of SSID is Navi_R130g, it’s suggested to use. Select the suitable item for you to use. It’s suggested to use Please click on “Next” button to connect to next step.
2.2.4 Wireless Security Setup The “Encryption” item of “Wireless Security Setup” is optional; which means you can choose it under your demand, herewith it’s divided into two categories of “WEP” and “WPA”, if you want to protect your transmitting data; you can select it depended on the level of your request. Please follow the instruction below to complete “Wireless Security Setup”. It’s an optional item. a.
It has low level (64-bit) and high level (128-bit). It has “10 characters” and “26 characters”; it will be listed under your selection is low level (64-bit) or high level (128-bit). No matter if you selection is either 10 or 26 hexadecimal digits (0~9, a~f, and A~F) in the pull-down menu bar of “Key Format”; it will be based on whether you select 64-bits or 128-bits in the “Key Length” pull-down menu.
Please select it under your demand Select it by your request Please input it as necessary After setting up, please click on Finished” button to connect to next step.
2.2.5 Quick Setup Finish The Quick Setup has been completed successfully when you see this screen. The system will be rebooting automatically and goes to the Product’s Diagram Homepage after 60 seconds.
Chapter 3 Client Mode’s Quick Setup 3.1 Client Mode’s Quick Setup Instruction Please switch the slide to “Client Mode” as the below instruction: Please open a Microsoft Internet Explorer, and enter http://192.168.100.
Please input in the blanks, the factory default values for User Name and Password are “admin” and “admin” (all in lowercase letters); after inputting, please click on “OK” to enter the Homepage as below:
3.
3.2.1 Time Zone Setting The section provides to change the Time. However, change the router’s date and time does not affect the date and time on your PCs. Please select your time Zone Please click on “Next” button to connect to next step.
3.2.2 LAN Interface Setup If you are using the Mini Router with multiple PCs on your LAN, please set up this function for multiple users to connect it. The default LAN IP for R130g is 192.168.100.1. Please click on “Next” button to connect to next step.
3.2.3 WAN Interface Setup R130g supports 4 connection types to WAN, select one of the WAN connection modes required by your ISP in below “WAN Access Type” page, the WAN setting pages will differ depending on what kind of WAN Type you select. Please click on “Next” button to connect to next step.
3.2.3.1 WAN Interface Setup–Static IP Choose Static IP Address if all WAN IP information is provided to you by your ISP. R130g will not accept the IP address if it is not in this format, and the blanks of “IP Address”, “Subnet Mask” and “Default Gateway” must be input. Input the data provided by ISP Input the data provided by ISP Input the data provided by ISP DNS also needs to be inputted, ,otherwise you can use the domain name. Please click on “Next” button to connect to next step.
3.2.3.2 WAN Interface Setup– DHCP Client Choose DHCP Client to obtain IP address information automatically from your ISP. Select this option if your ISP does not give you any IP numbers to use. Please click on “Next” button to connect to next step.
3.2.3.3 WAN Interface Setup– PPPoE If your ISP uses PPPoE connection, your ISP will provide you with a username and password. Input it by your ISP provided. Input it by your ISP provided. Please click on “Next” button to connect to next step.
3.2.3.4 WAN Interface Setup– PPTP Some DSL service providers supply a special DSL modem in Europe or Big Pond Cable in Australia. This kind of modem only supports the PPTP tunnel to access the Internet; Please enter the account’s information of Account and Password which provided by your ISP. IP Address, Server IP Address and Subnet Mask are all input as necessary. Please click on “Next” button to connect to next step.
3.2.4 Wireless Basic Settings This function is used to configure the wireless LAN clients which may connect to your Access Point; once you connect this Access Point successfully, this name will be listed automatically in the “SSID”. It’s up to the Access Point of wireless LAN clients that you connect. Please click on “Next” button to connect to next step.
3.2.5 Wireless Security Setup The “Encryption” item of “Wireless Security Setup” is optional; which means you can choose it under your demand, herewith it’s divided into two categories of “WEP” and “WPA”, if you want to protect your transmitting data; you can select it depended on the level of your request. Please follow the instruction below to complete “Wireless Security Setup”. It’s an optional item. a.
It has low level (64-bit) and high level (128-bit). It has “10 characters” and “26 characters”; it will be listed under your selection is low level (64-bit) or high level (128-bit). No matter if you selection is either 10 or 26 hexadecimal digits (0~9, a~f, and A~F) in the pull-down menu bar of “Key Format”; it will be based on whether you select 64-bits or 128-bits in the “Key Length” pull-down menu.
Please select it under your demand Select it by your request Please input it as necessary After setting up, please click on “Next” button to connect to next step.
3.2.
The system goes to the Product’s Diagram Homepage: Please go to the “4.