Audio Interface / Mobile Preamp Reference Manual TRACKERpre Reference Manual 1
Audio Interface / Mobile Preamp Reference Manual © 2007 E-MU Systems All Rights Reserved Revision: A E-MU World Headquarters E-MU Systems 1500 Green Hills Road Scotts Valley, CA 95066 USA Europe Creative Labs (Ireland) Ltd Ballycoolin Business Park Blanchardstown, Dublin 15 IRELAND Asia Pacific, Africa, Middle East Japan Creative Media K. K. Kanda Eight Bldg.
TABLE OF CONTENTS Introduction ................................................................................. 5 Package Includes .......................................................................... 6 Computer Requirements ............................................................... 7 Windows ..........................................................................................................7 OS X .............................................................................................
Troubleshooting ......................................................................... 46 Internet References .................................................................... 48 Forums ........................................................................................................ 48 Useful Information ..................................................................... 49 Cables - balanced or unbalanced? ...................................................................
Introduction INTRODUCTION Thank you for your purchase of the E-MU Tracker Pre USB 2.0 Audio Interface/ Mobile Preamp. This interface brings an unparalleled level of USB audio quality to the Mac or PC, with pristine 24-bit/192kHz A/D and D/A converters, ultra-low jitter clock, and XTC™ Class-A, ultra-low noise mic/line/hi-Z preamps. The signalto-noise specs of Tracker Pre USB 2.
Package Includes PACKAGE INCLUDES • E-MU Tracker Pre USB 2.0 Audio Interface • USB Cable (2 meters) • Installation Guide E-MU Software/Manual Installation CD-ROM (OS X /Windows) • • • • Windows XP, Windows x64, Windows Vista, Windows Vista x64 Drivers Mac OS X 10.4, Mac OS X 10.
Computer Requirements COMPUTER REQUIREMENTS The minimum computer system requirements for the E-MU Tracker Pre USB 2.0 are listed below. Windows • Intel® or AMD® processor — 1.2 GHz or faster • Intel, AMD, or 100% compatible motherboard & chipset • Microsoft® Windows® XP (SP 2 or greater), Windows XP x64, Windows Vista, or Windows Vista x64 • 1 available (Hi-Speed) USB 2.
Software Installation SOFTWARE INSTALLATION Windows XP or Windows Vista Follow these instructions to install the Tracker Pre USB 2.0 software and E-MU Production Tools software bundle on a Windows XP or Windows Vista computer. 1. First connect the Tracker Pre USB 2.0 to your computer using the supplied USB cable, and turn it on. 2. If Windows prompts you with an Add New Hardware Wizard, click Cancel. 3. Insert the E-MU Software/Manual Installation CD into your CD-ROM drive.
Software Installation 4. Select the E-MU Audio Drivers entry and then click the Change/Remove button. 5. In the InstallShield Wizard dialog box, select the Remove ALL option. 6. Click the Yes button. 7. Restart your computer when prompted. You may now re-install existing or updated E-MU device drivers or applications. To Reinstall the Drivers: 1. Disconnect the Tracker Pre USB connection. 2. Reboot your PC. 3. When the operating system has finished loading, re-connect the Tracker Pre USB connection.
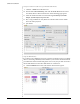
Software Installation Set-up the Tracker Pre USB 2.0 as your Default Audio Device 9. Click Go -> Utilities from the menu bar. 10. Double-click Audio MIDI Setup, then click the Audio Devices button if it’s not already selected. The window shown on the following page appears. 11. Select the Tracker Pre USB 2.0 for the following: Default Input, Default Output, System Output, Properties For. 12. Play a song on iTunes to verify that the Tracker Pre USB 2.0 is the default device for audio playback. 13.
Software Installation 15. If you have a USB class-compliant MIDI device connected, it will appear as an icon in the MIDI Devices window. 16. Press the close button to close the Audio MIDI Setup window. Install the Production Tools Software Bundle 17. Insert the Macintosh Production Tools CD into your CD-ROM drive. 18. Double-click on the installer package. 19. The installation splash screen appears. Follow the instructions on the screen. 20. Continue to install applications from the bundle as desired.
Basic Connections BASIC CONNECTIONS Microphone or Line Plug Instrument or Line Level into the center of the receptacle. WARNING! Use only a USB 2.0 certified Hi-Speed cable (like the one supplied) for the USB connection. Using a USB 1.1 cable may cause erratic behavior and degraded performance. Stereo Electret Mic Optional External Power (for standalone operation) Phantom Power On/Off Note: A mono microphone connects to Input 1L.
Insert Connection Example INSERT CONNECTION EXAMPLE EXTERNAL PROCESSOR (Compressor, EQ, etc.) ATTACK FAST 4 SLOW SLOW FAST COMPRESSOR 6 RED. METER 40 7 2 RELEASE OUTPUT 5 3 MEDIUM 60 80 75 3 8 4 VU 100 1 0 1 2 +3 9 1 0 GAIN 5 6 3 7 1 9 2 8 0 10 LINK BYPASS ON POWER 10 GAIN REDUCTION Input TIP . . . Tracker Pre can be used as a standalone, high-quality stereo microphone preamp if needed.
Controls & Headphone Output CONTROLS & HEADPHONE OUTPUT 1 2 3 4 5 6 1. Signal Level & Clip Indicators The LED signal level indicators show that you are inputting a proper signal level. With a proper input level, the green signal LED should be flickering, but the red clip indicator should NOT ever be lit. The clip indicators light and show that the input level has exceeded 0dBFS. 2. Left/Right Gain Controls These controls set the input gain from 0dB to +60dB for the two inputs. 3.
Input/Output INPUT/OUTPUT 7 8 9 10 11 12 13 12 7. 5 VDC Power Adapter (optional) Although the Tracker Pre is normally bus-powered via USB, it can also be powered by an external 5-Volt DC power adapter (optional) to allow it to be used as a stand-alone stereo microphone preamplifier. 8. USB Connects the Tracker Pre to your computer via the supplied USB cable. The USB connection provides two-way communication when connected to the computer.
E-MU USB Audio Control Panel E-MU USB AUDIO CONTROL PANEL After you have successfully installed the audio drivers, launch the E-MU USB Audio control panel. The E-MU USB Audio control panel is shown below. • Windows: The E-MU USB Audio control icon will be visible in the Taskbar, which is normally located in the bottom right of the screen. It can also be launched from the Start Menu (All Programs, Creative Professional, E-MU USB Audio Application).
Direct Monitoring DIRECT MONITORING Direct monitoring allows you to monitor inputs without having any software applications open. It can also be used as an alternative to software monitoring if you desire the lowest latency monitoring possible. When using a computer for digital recording, an audible time delay occurs while the audio signal is being input to the computer, processed by the software and then returned to the output for monitoring. This time delay is called Latency.
Tutorials TUTORIALS Introduction This guide contains step-by-step walk-throughs of basic recording operations using your Tracker Pre interface with software applications for your Windows or Macintosh OS X computer. We encourage you to perform the steps on your computer as you read so that you become familiar with the process. The first tutorial only takes about half an hour to complete, by which time you’ll know how to make a multitrack recording.
Tutorials Getting Started with Steinberg Cubase LE 4 (Windows, OS X) Steinberg Cubase LE 4 is a 24-bit, multi-track audio/MIDI sequencer with highquality effects, automation, virtual instruments (VSTi), and many other professional features. The following step-by-step tutorials are designed to get you recording as quickly as possible. 1 - Setting up Cubase LE 4 Follow these instructions carefully to ensure that Cubase LE 4 runs smoothly the first time.
Tutorials Step 10 Control Panel Step 9 VST Audio 10. Click the Control Panel button. The pop-up dialog box shown at right appears. 11. Set the ASIO Buffer Latency as low as your computer will allow and click OK. (10ms is a good starting point.) A low latency setting is important to assure fast response when using virtual instruments and to minimize delay when monitoring through Cubase. If you hear crackles or other audio problems, try increasing the Buffer Size.
Tutorials 2 - Basic Multitrack Recording This tutorial assumes you’re using a single input or a pair of inputs. For more advanced recording, refer to the Cubase LE 4 manual. Add an Audio Track 1. From the Cubase LE 4 menu bar, select Project, Add Track, Audio. A pop-up dialog box appears, asking you if you would like to add a mono or stereo track. Choose a mono track for now. After making your selection, click OK. A new audio track is added to the project window.
Tutorials NOTE Turning on the metronome adds a 2-bar lead-in before recording begins. 7. Optional Step - Metronome: To toggle the Metronome on and off, press C on the computer keyboard. To adjust the metronome output level, press the transport Play control, then select Metronome Setup... from the Transport menu. Use the volume slider to set the desired metronome level. 8. Press the Go to Previous Marker / Zero button. 9. Make sure the Record Enable button on the track is on (it should be on by default).
Tutorials 3 - Recording a MIDI Track using Proteus VX (Windows only) You’ll need a MIDI interface and a MIDI keyboard (or other MIDI input device) for this tutorial. Make the Connections 1. Connect the MIDI out of your MIDI keyboard to the MIDI input of your MIDI interface. 2. From the Project menu, select Add Track, Instrument. 3. A pop-up dialog box appears asking you to select a VST Instrument. Select Proteus VX. Select a Count of 1. Click OK.
Tutorials Open VX & Load a Bank 4. Since Proteus VX is a sampler, you need to load a bank of samples before it can be played. The Edit Instrument button, located in the Inspector section of the window, allows you to edit the virtual instrument. Edit Instrument Button 5. Click the Edit Instrument button. The Proteus VX main window appears. Preset Inc/Dec Keys MIDI Channel Selection 6. Now we can load the Proteus X Composer bank. Select Proteus X Composer from the File menu.
Tutorials 11. Feel free to play around for awhile and don’t worry about losing anything. Nothing is made permanent until you Save the bank, so have fun. To Record a MIDI Track 12. Make sure the Record Enable button on the MIDI track is on (it should be on by default). Record Enable 13. Click Record on the Cubase LE Transport control and start playing your MIDI controller. Record 14. Press Stop when you’re finished recording the first track. 15. Press the Go To Start button. 16.
Tutorials Getting Started with Cakewalk Sonar 6 LE (Windows) Sonar 6 LE is a 24-bit multi-track audio/MIDI sequencer with high-quality effects, automation, virtual instruments (VSTi/DXi), and many other professional features. The following step-by-step tutorials are designed to get you recording on Sonar LE 6. After you finish the tutorial we encourage you to read the Sonar 6 LE PDF manual in order to learn about the many features of this comprehensive program.
Tutorials Set-up the Audio Options 5. From the Options menu, select Audio... The following dialog box appears. 6. Click on the Advanced Tab to access the next window. 7. Select ASIO as the Driver Mode and click OK. You’ll get a pop-up dialog box explaining that the ASIO settings won’t take effect until the next time you start Sonar 6 LE. 8. Close Sonar 6 LE completely and restart the application.
Tutorials Return to the Audio Setup Options 9. Once Sonar 6 LE has restarted, select Audio from the Options menu. 10. Click the ASIO Panel. The pop-up dialog box shown at right appears. 11. Set the ASIO Buffer Latency as low as your computer will allow. A low latency setting is important to assure fast response when using virtual instruments and to minimize delay when monitoring through Sonar LE 6. If you hear crackles or other audio problems, try slightly increasing the Buffer Size. 12.
Tutorials 2 - Basic Multitrack Recording This tutorial assumes you’re using a single input or pair of inputs. Sonar opens by default with 1 audio track and 1 MIDI track. The Sonar Project Window The Track Pane The Clips Pane Track Record Enable Step 5 1. Track 1 is an audio track. Locate the input and output routing fields in the Track Pane as shown at right. Input Click Here 2. Select the input source by clicking Output on the small triangle on the input field.
Tutorials 6. If your input signal is either too weak or too strong, adjust the input level control on the Tracker Pre. 7. Optional Step - Metronome: From the Options Menu, select Project. Select the Metronome tab. Next select “Use Audio Metronome”. Click OK. Make sure the Metronome During Record button in the Transport Bar is On. Record a Track 8. Press Record on the Sonar 6 LE Transport control and start playing. Return-To-Zero Stop Play Record 9.
Tutorials 3 - Recording a MIDI Track using Proteus VX These instructions explain how to start Proteus VX from within Sonar LE 6. You’ll need a MIDI interface and a MIDI keyboard (or other MIDI input device) for this tutorial. NOTE Proteus VX can also run as a standalone application. 1. Connect the MIDI output of your MIDI keyboard to the MIDI input of your MIDI interface. Select the Virtual Instrument 2. From the Insert menu, select Soft Synths, E-MU, ProteusVX from the View menu. 3.
Tutorials The MIDI Connection 5. Your MIDI Interface should already be selected as the MIDI input in Omni mode. You can examine this setting if you wish, by clicking on the “Restore Strip Size” box on the new MIDI track that was created. • Note: “Omni” mode allows Proteus VX VSTi to receive on all 16 MIDI channels from your MIDI keyboard. (Proteus VX VSTi is “multi-timbral” and can assign a different preset to each of the 16 MIDI channels.) TIP . . .
Tutorials 10. Bring up the mini keyboard by clicking the icon on Proteus VX and play a few notes. You should be hearing sound. If not, verify that the Tracker Pre is properly configured. • Note: If the sound volume is very low, you can decrease the Headroom of Proteus VX. (Options, Preferences, Headroom/Boost) Keep in mind that with less headroom, Proteus VX will be more prone to clipping when multiple channels are played. 11. Play your MIDI controller and verify that it plays Proteus VX.
Tutorials To Record a MIDI Track 16. Minimize the Proteus VX window by pressing the minimize button on Proteus VX. 17. Maximize the Proteus VX MIDI track by pressing the Maximize button. Maximize 18. The Track Pane expands to show all the track options, as shown at right. Set the Channel field (CH) to 1:Proteus VX. (This converts data on ANY incoming MIDI channel to Channel 1 data.) 19. Restore the Strip to its normal size by clicking the “Restore Strip Size” button. 20.
Tutorials 28. Select MIDI Channel 2 in the Ch. field as shown at right. 29. Record Disable the previous MIDI track by clicking the Track Record Enable button. 30. Record Enable your new MIDI track by clicking its Track Record Enable button. Record Disable this track Record Enable this track 31. Restore the Proteus VX editor by double-clicking on the little keyboard icon in the Proteus VX track. 32.
Tutorials Getting Started with Ableton Live Lite 6 (Windows/OS X) This guide contains a basic walk-through of Ableton Live Lite 6 (E-MU Edition) to get you recording and playing back audio. A Proteus VX tutorial is also included for Windows users. We encourage you to perform the steps on your computer as you read so that you can “learn by doing.” Ableton Live Lite 6 is an innovative composition and performance tool.
Tutorials Check the MIDI Parameters 3. Click the MIDI/Sync tab of the Preferences dialog box. The MIDI Setup page appears. Windows NOTE Live enables every MIDI input by default. Select MIDI Interface OS X 4. Your MIDI interface or USB MIDI keyboard should appear in the list. Make sure it’s selected. Demo Mode In order to save your Live Sets, Demo Mode must be Off for all products. Ableton Live Lite 6 - E-MU Edition installs with Demo mode On for the other Ableton products such as Operator and Simpler.
Tutorials 2 - Follow the Live 6 Lessons Ableton Live contains built-in tutorials to help you learn your way around. If you don’t see the Lessons pane on the right side of the window, simply select Lessons from the View menu. Click here to see the Lessons Follow these Lessons Click here to see the Lessons 1. The first Lesson - Recording Audio, explains the basics of recording using your Tracker Pre. 2. Lesson 2 - Playing Software Instruments, is also highly recommended.
Tutorials 3 - Running Proteus VX from Ableton Live (Windows only) These instructions explain how to run Proteus VX from within Ableton Live Lite 6. Proteus VX adds a professional-quality sample player and over 1000 new sounds and integrates perfectly with Ableton Live Lite 6. In this tutorial, you’ll learn how to use a MIDI keyboard and the pre-recorded MIDI loops that come with Ableton Live Lite 6 to play Proteus VX. NOTE These instructions also apply to Proteus X or Emulator X.
Tutorials Preset Inc/Dec MIDI Channel Inc/Dec MIDI Channel 7. Make sure Proteus VX is set to MIDI Channel 1 as shown above. 8. Using the preset increment/decrement keys, select Preset 0005 - Rock’in B. Proteus VX Instrument 9. Close the Proteus VX editor by clicking the close box. This only hides the editor screen and doesn’t close Proteus VSTi. 10. Notice that you now have a new MIDI Track and that the Proteus VX Instrument now appears at the bottom of the window. 11.
Tutorials Change the Preset from Live 15. When you have a clip you like, click the Clip Overview Hot Spot or simply double-click on the clip. (Hint: Shift+Tab toggles the view.) NOTE Proteus VX sounds are called Presets or Programs. Ableton Live Programs are offset by +1 from Proteus VX. Clip Overview Hot Spot The Clip View appears at the bottom of the application window. Show/Hide Notes Box Program Select Field 16. Click on the Show/Hide Notes Box to reveal the notes box as shown above. 17.
Tutorials 4 - Record a MIDI Track in Live using your MIDI Keyboard Proteus VX is a multi-timbral instrument with the ability to play 16 different sounds at once. Let’s get ready to make a multitrack MIDI recording. 1. Click the Track View Selector at the bottom of the window or simply doubleclick on the clip to show the Proteus VX Device. (Shift+Tab toggles the view.) Track View Selector The Proteus VX Device appears as shown below. 2. Click on the Tool icon to bring up the Proteus VX editor.
Tutorials 7. Open the Preferences via the Options menu (PC) or Live menu (OS X) and choose the Record/Warp/Launch tab. Set the Count-in to any value other than “None.” Live doesn’t start recording until the count-in period has elapsed and gives you time to get ready after pressing “Record.” Close the Window. 8. Delete all the Clips in your MIDI track. (Select a clip and hit backspace to delete it.
Tutorials 17. Click and drag the Loop End triangle so that it lines up with the number 5. Now the loop is exactly 4 bars long and will sync with the rest of the song. Drag Here 18. Start up the Verse again using the Scene Launch button. Now it should play in perfect sync. 19. For fun, try changing the Program Number. Remember how? Click the Show/Hide Notes icon, give Program the focus, then change the Program number while the scene is playing using the up/down keys. 20.
Tutorials Get Ready to Record on Channel 2 28. Turn Arm Session Record On. You should now be hearing the preset you selected on channel 2 when you play your MIDI keyboard. 29. Start up the Verse using the Scene Launch button and practice playing along with it. 30. Click one of the round MIDI Clip Record buttons to begin recording. Recording will begin after the Count-In period you specified. 31. Click the Spacebar to stop recording. Saving your Work 32.
Troubleshooting TROUBLESHOOTING Can’t hear Windows Media Player in Windows If you currently have another audio device installed in your PC, or have had one installed in the past, you may have to set the Tracker Pre USB 2.0 as the “Default Audio Device”. 1. Open the Control Panel, then select Sounds and Audio Devices. 2. Click the Audio tab and select E-MU Tracker Pre USB 2.0 as the Default device under Sound Playback. 3. Click the Volume button under Sound Playback and turn up Wave volume.
Troubleshooting Simultaneous WDM/ASIO Playback (PC only) The Tracker Pre USB 2.0 only supports playing back one stream format at a time on the PC. Each of the two mentioned stream types has an associated priority. If a higher priority stream type is opened while a lower priority stream is already playing, the lower priority stream will stop playing. ASIO has the highest priority, followed by WDM. Tracker Pre USB 2.0 vs. USB 1.1 Operation (PC only) The Tracker Pre can operate in either USB 2.0 or USB 1.
Internet References INTERNET REFERENCES The internet contains vast resources for the computer musician. A few useful sites are listed here, but there are plenty more. Check it out. Software Updates, Tips & Tutorials . http://www.emu.com/support Setting up a PC for Digital Audio .... http://www.musicxp.net Audio Recording ................................. http://www.recording.org MIDI & Audio Recording................... http://www.midiworld.com MIDI & Audio Recording................... http://www.
Useful Information USEFUL INFORMATION Cables - balanced or unbalanced? All inputs and outputs on the E-MU Tracker Pre are designed to use EITHER balanced or unbalanced cables. Balanced signals provide an additional +6 dB of gain on the inputs and are recommended for best audio performance, although unbalanced cables work fine for most applications. If you’re having problems with hum and noise, or just want the best possible performance, use balanced cables.
Useful Information Adapter Cables 1/8” Mini-phone to 1/4” Adapters To connect headphones with an 1/8” (mini-phone) plug to the headphone jack on the MicroDock, you’ll need a 1/8” to 1/4” adapter. These handy devices are available at electronic department stores everywhere. Cinch (RCA) to 1/4” Adapters Equipment (such as consumer audio gear) which uses Cinch/RCA type connectors can be connected to the MicroDock using readily available adapter cables.
Technical Specifications TECHNICAL SPECIFICATIONS General Sample Rates: 44.1, 48, 88.2, 96, 176.4, 192kHz from internal crystal with no sample rate conversion (Note: 176.4k & 192k sample rates not supported on Macintosh) Bit Depth: 24-bit I/O, 32-bit processing USB 2.0 Hi-Speed Full 24-bit resolution at all sample rates 2 input and 2 output channels Zero-latency direct hardware monitoring (disabled at 176.
Technical Specifications Analog Line Outputs (2) Type: balanced, AC-coupled, 2-pole low-pass differential filter D/A converter: CS4392 Max Level: Consumer: +6.6dBV max (unbalanced) Frequency Response: (20Hz - 20kHz) 0.00/-0.08dB Dynamic Range: (1kHz, A-weighted) 112dB Signal-to-Noise Ratio: (A-weighted) 112dB THD+N: (1kHz at -1dBFS) -99dB (.
Declaration of Conformity DECLARATION OF CONFORMITY Trade Name: E-MU Systems Model No.: EM8740 Responsible Party: E-MU Systems Address: 1500 Green Hills Road, Suite 101 Scotts Valley, CA 95066 U.S.A. This device complies with Part 15 of the FCC rules. Operation is subject to the following two conditions: (1) This device may not cause harmful interference, and (2) this device must accept any interference received, including interference that may cause undesired operation.
Declaration of Conformity Compliance Information United States Compliance Information FCC Part 15 Subpart B Class B using: CISPR 22 (1997) Class B ANSI C63.4 (2003) method FCC Site No. 958979 Canada Compliance Information ICES-0003 Class B using: CISPR 22 (1997) Class B ANSI C63.4 (2003) method Industry of Canada File No.
Index INDEX Numerics 1/8" Mini-phone to 1/4" Adapters 50 48 Volt Phantom Power 50 A Ableton Live Lite 4 for E-MU running Proteus VX in 39 setting up 36 tutorial 36 Add Track, Cubase LE 23 ASIO Buffer Latency 20, 28 B Balanced Cables 12, 49 C Clip Indicators 14 Clipping, Proteus VX 24, 33 Comb Filter Effect, caused by direct monitor 17 Compressor, inserting 13 Computer Requirements 7 Computer Speakers, connecting 12 Connection Diagram 12, 15 Continuous Controller numbers 45 Control Panel 20 Cubase LE proje
Index P Package Contents 8 Phantom Power 15 description 50 Pops & Crackles 46 Program Changes Sonar LE 33 Project Window, Cubase LE 19 Proteus VX editor screen 32 using with Ableton Live Lite 39 using with Cubase LE 23 using with Sonar LE 31 U Unbalanced Cables 49 Uninstalling Drivers & App 8, 11 USB 1.1 Port 15 USB 1.1 Warning Message 47 USB 2.0 vs. USB 1.