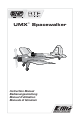
™ UMX Spacewalker Instruction Manual Bedienungsanleitung Manuel d’utilisation Manuale di Istruzioni
EN NOTICE All instructions, warranties and other collateral documents are subject to change at the sole discretion of Horizon Hobby, LLC. For up-to-date product literature, visit www.horizonhobby.com and click on the support tab for this product.
EN Table of Contents Preflight Checklist ..................................................4 Charging Warnings.................................................4 Battery Charging....................................................5 Transmitter Batteries Installation ............................6 Transmitter and Receiver Binding...........................6 Digital Trims...........................................................7 Dual Rate Function ................................................
l EN Preflight Checklist 1. Charge flight battery. 6. Set dual rates and expos. 2. Install flight battery in aircraft (once it has been fully charged). 7. Adjust center of gravity. 3. Bind aircraft to transmitter. (BNF only) 4. Make sure linkages move freely. 5. Perform Control Direction Test with transmitter. 8. Perform a radio system Range Check. 9. Find a safe and open area. 10. Plan flight for flying field conditions.
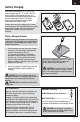
EN Battery Charging Your aircraft comes with a 1S 3.7V DC Li-Po battery charger and 1S 3.7V 70mAh 14C Li-Po battery. Refer to the charging warnings. It is recommended to charge the battery pack while you are inspecting the aircraft. The flight battery will be required to confirm proper aircraft operation in future steps. Remove the cover on the bottom of the charger and install four of the included AA batteries, noting proper polarity. Replace the cover after the AA batteries are installed.
EN Transmitter Batteries Installation Your E-flite® 4-channel DSM2®/ DSMX® RTF transmitter comes pre-bound to the aircraft. Remove the cover, install four of the included batteries (noting proper polarity) and reinstall the cover. 1 2 3 6 4 5 Transmitter and Receiver Binding Binding is the process of programming the receiver to recognize the GUID (Globally Unique Identifier) code of a single specific transmitter.
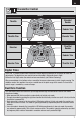
EN Transmitter Control Mode 2 Elevator/ Rudder Throttle Rudder Trim Throttle Trim Elevator Trim Mode 1 Elevator Throttle/ Rudder Rudder Trim Elevator Trim Throttle Trim Digital Trims The E-flite® 4-channel DSM2/DSMX transmitter features digital trim buttons on all controls to make fine adjustments. The digital trims are used to fine-tune the model’s flight path when in flight. Before the first flight, center the control surfaces mechanically (see Control Centering).
EN Flight Battery Installation and ESC Arming Arming the ESC also occurs after binding as previously described, but subsequent connection of a flight battery requires the following steps. It is normal for linear servos to make noise. Noise is not an indication of a faulty servo. CAUTION: Always keep hands away from the propeller. When armed, the motor will turn the propeller in response to any throttle movement. 1 Lower throttle and throttle trim to lowest settings.
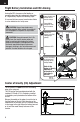
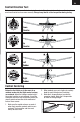
EN Control Direction Test Bind your aircraft and transmitter before doing these tests. Move the controls on the transmitter to make sure aircraft control surfaces move correctly. Always keep throttle at the low position during testing. Down Elevator Up Elevator Left Rudder Right Rudder Control Centering Before the first flights, or in the event of an accident, make sure the flight control surfaces are centered. Adjust the linkages mechanically if the control surfaces are not centered.
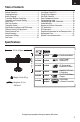
EN Control Horn Settings The table to the right shows the factory settings for the control horns. Fly the aircraft at factory settings before making changes. After flying, you may choose to adjust the linkage positions for the desired control response. Elevator Rudder CAUTION: When these are incorrectly connected for the pilot’s skill level, unexpected aircraft response to controls can result. This can cause damage to the aircraft and personal injury.
EN Flying Tips and Repairs We recommend flying your aircraft inside a large gymnasium. We do not recommend flying the aircraft outdoors unless the conditions are absolutely calm. The aircraft is extremely light and can be easily blown away. Takeoff Place the aircraft in position for takeoff (facing into the wind if flying outdoors). Set dual rates to low position and gradually increase the throttle to ¾ to full and steer with the rudder.
EN Power Components Service CAUTION: DO NOT handle propeller parts while the flight battery is connected. Personal injury could result. Disassembly 1. Disconnect the battery from the ESC/receiver. 2. Carefully cut the tape and/or decals on the side of the fuselage to remove the top of the fuselage. 3. Hold the prop shaft using needle-nose pliers or hemostats. ove em Inst al l R IMPORTANT: Removing tape and/or decals can remove paint from the fuselage. 4.
EN Troubleshooting Guide Problem Aircraft will not respond to throttle but responds to other controls Possible Cause Solution Throttle stick and/or throttle trim too high Reset controls with throttle stick and throttle trim at lowest setting Throttle channel is reversed Reverse throttle channel on transmitter Motor disconnected from receiver Open fuselage and make sure motor is properly connected to the receiver Extra propeller noise or extra vibration Damaged propeller, prop shaft, spinner or mo
EN Troubleshooting Guide (Continued) Problem Motor loses power Possible Cause Solution Damage to motor or power components Do a check of motor and power components for damage (replace as needed) Flight battery charge is too low Fully recharge flight battery Motor power quickly decreases and increases then motor loses power Battery power is down to the point of receiver/ESC Low Voltage Cutoff (LVC) Recharge flight battery or replace battery that is no longer performing Servo locks or freezes at full
EN Return Merchandise Authorization (RMA) number. Pack the Product securely using a shipping carton. Please note that original boxes may be included, but are not designed to withstand the rigors of shipping without additional protection. Ship via a carrier that provides tracking and insurance for lost or damaged parcels, as Horizon is not responsible for merchandise until it arrives and is accepted at our facility. An Online Service Request is available at http://www.horizonhobby.
EN FCC Information This device complies with part 15 of the FCC rules. Operation is subject to the following two conditions: (1) This device may not cause harmful interference, and (2) this device must accept any interference received, including interference that may cause undesired operation. CAUTION: Changes or modifications not expressly approved by the party responsible for compliance could void the user’s authority to operate the equipment.
Replacement Parts – Ersatzteile – – Pièces de rechange – Pezzi di ricambio – Part # • Nummer Numéro • Codice Description Beschreibung Description Descrizione EFLU2702 Decal Sheet: UMX Spacewalker Dekorbogen: UMX Spacewalker Planche de décalcomanies : UMX Spacewalker Foglio con decalcomanie: UMX Spacewalker EFLU2703 Landing Gear Set: UMX Spacewalker Fahrgestellsatz: UMX Spacewalker Jeu de train d’atterrissage : UMX Spacewalker Set carrello di atterraggio: UMX Spacewalker EFLU2720 Main Wing Se
– Optional Parts and Accessories – – Optionale Bauteile und Zubehörteile – – Pièces optionnelles et accessoires – – Pezzi opzionali e accessori – Part # • Nummer Description Numéro • Codice Beschreibung Description Descrizione PKZ1039 Hook and Loop Set (5): Ultra Micros Parkzone: Klettband Set Ultra Micros Ultras Micros - Bande Set fascette a strappo auto-agrippante (5) (5): Ultra Micro EFLC1004 Celectra 4-Port 1S 3.7V 0.
© 2014 Horizon Hobby, LLC. E-flite, Celectra, UMX, DSM, DSM2, DSMX, ModelMatch, Bind-N-Fly, the BNF logo and the Horizon Hobby logo are trademarks or registered trademarks of Horizon Hobby, LLC. The Spektrum trademark is used with permission of Bachmann Industries, Inc. Futaba is a registered trademark of Futaba Denshi Kogyo Kabushiki Kaisha Corporation of Japan. All other trademarks, service marks and logos are property of their respective owners. US 7,898,130. US D578,146. PRC ZL 200720069025.