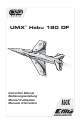
™ UMX Habu 180 DF Instruction Manual Bedienungsanleitung Manuel d’utilisation Manuale di Istruzioni
EN NOTICE All instructions, warranties and other collateral documents are subject to change at the sole discretion of Horizon Hobby, Inc. For up-to-date product literature, visit www.horizonhobby.com and click on the support tab for this product.
EN ® ™ ® hank you for purchasing the E-flite UMX Habu 180 DF Bind-N-Fly aircraft. Modeled after the popular Tto meet EDF sport jet design, you get exhilarating performance, plus handling that’s been custom engineered the specific needs of the RC sport pilot. With the UMX Habu 180 DF, you can expect impressive maneuverability and agility at a variety of speeds and the stability to hold almost any attitude.
EN Preflight Checklist 9 9 1. Charge flight battery. 6. Set dual rates and expos. 2. Install flight battery in aircraft (once it has been fully charged). 7. Adjust center of gravity. 3. Bind aircraft to transmitter. 4. Make sure linkages move freely. 5. Perform Control Direction Test with transmitter. 8. Perform a radio system Range Check. 9. Find a safe and open area. 10. Plan flight for flying field conditions.
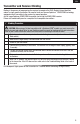
EN Transmitter and Receiver Binding Binding is the process of programming the receiver to recognize the GUID (Globally Unique Identifier) code of a single specific transmitter. You need to ‘bind’ your chosen Spektrum™ DSM2/DSMX technology equipped aircraft transmitter to the receiver for proper operation. Any full range Spektrum DSM2/DSMX transmitter can bind to the DSM2/DSMX receiver. Please visit www.bindnfly.com for a complete list of compatible transmitters.
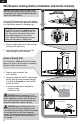
EN ESC/Receiver Arming, Battery Installation and Center of Gravity NOTICE: Always keep material or debris away from the intake. When armed, the rotor will turn in response to the throttle movement and could ingest in any loose objects. 1 A Arming the ESC/receiver also occurs after binding as previously described, but subsequent connection of a flight battery requires the following steps. AS3X The AS3X® system will not activate until the throttle stick or trim is increased for the first time.
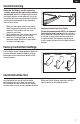
EN Control Centering Before the first flights, or in the event of an accident, make sure the flight control surfaces are centered. Adjust the linkages mechanically if the control surfaces are not centered. Use of the transmitter sub-trims may not correctly center the aircraft control surfaces due to the mechanical limits of linear servos. 1. Make sure the control surfaces are neutral when the transmitter controls and trims are centered. The transmitter sub-trim must always be set to zero. 2.
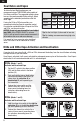
EN Dual Rates and Expos To obtain the best flight performance, we recommend using a DSM2/DSMX radio capable of Dual Rates and Expo. The suggested settings shown here are the recommended starting settings. Adjust according to the individual preferences after the initial flight. If using the DX4e or DX5e transmitters, we recommend activating Expo for smoother control. For activation and deactivation of Expo in the DX4e and DX5e, see the next section. NOTICE: Do not set your transmitter travel adjust over 100%.
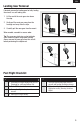
EN Landing Gear Removal If desired, remove the landing gear for belly landing the aircraft in a soft landing area. 1. Lift the end of the main gear wire above the stop. 2. Gently pull the main gear away from the fuselage and away from the clips. 3. Carefully pull the nose gear from the mount. When needed, assemble in reverse order. Tip: The nose gear strut wire can be twisted a small amount to adjust the ground tracking. Always remove the nose gear from the aircraft before performing this adjustment.
EN Flying Tips and Repairs Range Check your Radio System Landing After final assembly, range check the radio system with the aircraft. Refer to your specific transmitter instruction manual for range test information. Always land into the wind. Fly the landing pattern with a slightly nose high attitude. Use throttle management to control the decent rate of the aircraft. Flying We recommend flying your aircraft outside in no greater than moderate winds or inside in a very large indoor facility.
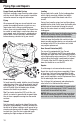
EN Power Components Service Disassembly CAUTION: DO NOT handle the rotor or motor while the flight battery is connected. Personal injury could result. 1. The canopy hatch is secured to the fuselage using double-sided tape under the outside edge. Carefully remove the canopy hatch; replacing the double-sided tape as needed. NOTICE: Removing tape or decals can damage paint on your aircraft. Avoid pinching or otherwise damaging any wires when opening or closing the fuselage. 2.
EN Troubleshooting Guide AS3X Problem Possible Cause Solution Control surfaces not at neutral position when transmitter controls are at neutral Control surfaces may not have been mechanically centered from factory Center control surfaces mechanically by adjusting the U-bends on control linkages Aircraft was moved after the flight battery was connected and before sensors initialized Disconnect and reconnect the flight battery while keeping the aircraft still for 5 seconds Model flies inconsistently fro
EN Troubleshooting Guide (Continued) Problem Possible Cause Solution LED on receiver flashes Less than a 5-second wait between first rapidly and aircraft will powering on transmitter and connecting not respond to transmit- flight battery to aircraft ter (after binding) Aircraft bound to different model memory (ModelMatch™ radios only) Control surface does not move Leaving transmitter on, disconnect and reconnect flight battery to aircraft Select correct model memory on transmitter and disconnect and recon
EN of purchase is required for all warranty claims. SERVICE OR REPLACEMENT AS PROVIDED UNDER THIS WARRANTY IS THE PURCHASER’S SOLE AND EXCLUSIVE REMEDY.
EN Warranty and Service Contact Information Country of Purchase United States of America United Kingdom Germany France China Horizon Hobby Phone Number/Email Address Address Horizon Service Center servicecenter.horizonhobby. (Repairs and Repair Requests) com/RequestForm/ www.quickbase.com/db/ Horizon Product Support 4105 Fieldstone Rd bghj7ey8c?a=GenNewRecord (Product Technical Assistance) Champaign, Illinois, 61822 USA 888-959-2305 sales@horizonhobby.com Sales 888-959-2305 sales@horizonhobby.co.
IT Replacement Parts – Ersatzteile – – Pièces de rechange – Recapiti per i ricambi – Part # • Nummer Numéro • Codice Description Beschreibung Description Descrizione EFLU4446 Pushrod Linkage Set: UMX Habu 180 DF BNF Basic E-flite UMX Habu BNF Basic: Gestänge / Anlenkungen Set de tringleries: UMX Habu 180 DF BNF Basic Set barrette comandi: UMX Habu 180 DF BNF Basic EFLU4455 Landing Gear Set: UMX Habu 180 DF BNF Basic E-flite UMX Habu BNF Train d’atterrissage: Basic: Fahrwerkset UMX Habu 180 DF BNF
IT – Optional Parts and Accessories – – Optionale Bauteile und Zubehörteile – – Pièces optionnelles et accessoires – – Parti opzionali e accessori – Part # • Nummer Description Numéro • Codice Beschreibung Description Descrizione PKZ1039 Hook and Loop Set (5): Ultra Micros Klettband (5): Ultra Micros Bande autoagrippante (5) Set fascette fissaggio (5): Ultra Micros EFLUC1007 Celectra 2S 7.4V DC Li-Po Charger Celectra 2S 7.4V DC Li-Po Ladegerät Celectra Chargeur Li-Po 7.4V 2S Celectra 2S 7.
© 2013 Horizon Hobby, Inc. E-flite, AS3X, Blade, Celectra, UMX, DSM, DSM2, DSMX, ModelMatch, Bind-N-Fly and the Bind-N-Fly logo are trademarks or registered trademarks of Horizon Hobby, Inc. The Spektrum trademark is used with permission of Bachmann Industries, Inc. Futaba is a registered trademark of Futaba Denshi Kogyo Kabushiki Kaisha Corporation of Japan. US 7,898,130. US D578,146. PRC ZL 200720069025. PRC ZL 2007001249. Other patents pending. www.e-fliterc.