
UMX F-27 Evolution BNF Basic Manual


9
EN
Post-Flight Inspection
Cleaning Make sure the battery is not connected before cleaning. Remove dust and debris with a soft brush or a dry lint free cloth.
Airframe
Check the airframe for any cracks or other damage. Minor repairs to the foam can be made using CA or epoxy.
Badly damaged parts should be replaced.
Control
Linkages
Make sure the control horns are secure. Make sure the control rods are secure in the control horns.
Wiring Make sure wiring does not contact moving parts. Replace damaged wiring and loose connectors.
Fasteners
Make sure there are no loose screws, other fasteners or connectors. Do not over tighten metal screws in plastic
parts. Tighten screw so parts are mated together, then turn screw only 1/8th of a turn more.
Propeller
Make sure there is no damage to the propeller blades. Damage includes cracks, burrs, chips or scratches. Replace
damaged parts before the next ight.
Receiver
Make sure the electronics are securely attached to the frame. The aircraft will crash if the receiver separates
from the frame.
Post Flight
1. Disconnect the flight battery from the flight controller
2. Power OFF the transmitter.
3. Remove the flight battery from the aircraft.
4. Recharge the flight battery.
5. Repair or replace all damaged parts.
6. Store the flight battery apart from the aircraft and monitor
the battery charge.
7. Make note of the flight conditions and flight plan
results, planning for future flights.
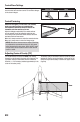
In Flight Trimming
Familiarize yourself with the Flying Your Aircraft section
prior to trimming your aircraft. Trimming should be done in
calm wind conditions and with a fully charged transmitter
and flight battery. Trimming should only be necessary in
AS3X mode, as the flight controller will compensate for
minor trim issues in SAFE mode. It is important to make
any trim adjustments mechanically in the control linkages
and re-set the transmitter trims to center to keep any
changes made from affecting SAFE mode.
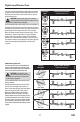
1. Power on and takeoff normally.
2. Change the fl ight mode to AS3X and fl y straight and
level at approximately 3/4 throttle.
3. Trim the aircraft for level fl ight using the trim buttons
on the transmitter.
4. When the aircraft maintains reasonable straight and
level fl ight, land the aircraft.
5. Set the fl ight mode back to AS3X mode if it was
changed for landing. Power cycle the aircraft. Do not
activate the throttle. Take note of the neutral postion of
the control surfaces.
6. Adjust the control linkages mechanically, as shown in
the “Control Centering” section, to compensate for the
amount of trim entered.
7. Re-center the trims on the transmitter. The transmit-
ter trims should always be centered for best fl ight
performance.
8. Fly the aircraft again to check the changes made.
9. Repeat the trimming process until the aircraft will
maintain reasonable straight and level fl ight without
excessive control corrections.
When the initial trimming process is done, the aircraft
should not require large amounts of trimming on
subsequent flights. If large amounts of trim are needed to
hold straight and level on later flights, land the aircraft and
check the control surfaces for damage or binding.
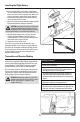
WARNING: Remove the propellers from the motors prior to performing any troubleshooting or maintenance.
Failure to do so may cause serious injury if the motors start unexpetedly.