™ UMX Carbon Cub SS Instruction Manual Bedienungsanleitung Manuel d’utilisation Manuale di Istruzioni
EN NOTICE All instructions, warranties and other collateral documents are subject to change at the sole discretion of Horizon Hobby, Inc. For up-to-date product literature, visit www.horizonhobby.com and click on the support tab for this product.
EN The E-flite® UMX™ Carbon Cub SS BNF is a feature-rich scale BNF model that’s an escape from the ordinary. Its high-output brushless power system will allow you to leap from tight spots and, with its fully-functional flaps, is simply a joy to fly. Large credit for its gentle manners go to the onboard AS3X™ system, which makes handling super-smooth, even in moderate winds, and provides rock solid control agility.
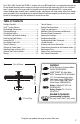
EN Preflight Checklist 1. Charge flight battery. 6. Adjust center of gravity. 2. Install flight battery in aircraft (once it has been fully charged). 7. Perform a radio system Range Check. 3. Bind aircraft to transmitter. 8. Find a safe and open area. 4. Make sure linkages move freely. 9. Plan flight for flying field conditions. 5. Perform Control Direction Test with transmitter.
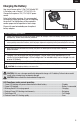
EN Charging the Battery Your aircraft comes with a 2-Cell 7.4V 180mAh 20C Li-Po battery and a Celectra™ 2S 7.4V DC Li-Po Charger that requires a 12V (11V-14V) DC power source. Refer to the battery warnings. It is recommended to charge the battery pack while you are inspecting the aircraft. The flight battery will be required to confirm proper aircraft operation in future steps. Please visit www.horizonhobby.com for optional battery adapters. 2S 7.
EN Transmitter and Receiver Binding Binding is the process of programming the receiver of the control unit to recognize the GUID (Globally Unique Identifier) code of a single specific transmitter. You need to ‘bind’ your chosen SpektrumTM DSM2™/ DSMX® technology equipped aircraft transmitter to the receiver for proper operation. Any full range JR® or Spektrum DSM2/DSMX transmitter can bind to the AS3X™ DSM2/DSMX® receiver. Please visit www.bindnfly.com for a complete list of compatible transmitters.
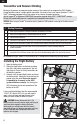
EN Arming the ESC Arming the ESC also occurs after binding as previously described, but subsequent connection of a flight battery requires the steps below. 1 Lower throttle and throttle trim to lowest settings. Power on the Transmitter then wait 5 seconds 2 3 Install flight battery and connect it to the ESC. Keep plane immobile and away from wind for 5 seconds.
EN Control Centering Before the first flights, or in the event of an accident, make sure the flight control surfaces are centered. Adjust the linkages mechanically if the control surfaces are not centered. Use of the transmitter sub-trims may not correctly center the aircraft control surfaces due to the mechanical limits of linear servos. 1. Make sure the control surfaces are neutral when the transmitter controls and trims are centered. The transmitter sub-trim must always be set to zero. 2.
EN Control Direction Test You should bind your aircraft and transmitter before doing these tests. Move the controls on the transmitter to make sure aircraft control surfaces move correctly and in the proper direction. Make sure tail linkages move freely and that paint or decals are not adhered to them. The flap servo is connected to channel 5 (Gear) of the receiver. The flaps should remain in the UP position for the first few flights until you are comfortable with the aircraft.
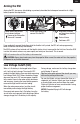
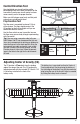
EN Optional Tow Plate Installation 1. Align the two screws and holes in the tow plate with the holes in the mount on top of the fuselage. The hole for the tow line in the bracket should be toward the back of the aircraft (see illustration). 2. Fully tighten the screws on the fuselage. Make sure that you do not over tighten the screws. 3. Tie the tow line to the tow plate using a nonslip knot after installing the tow plate. Towing Towing with the Carbon Cub is only recommended for advanced pilots.
EN Recommended Aircraft Towing Positions When Flying 28 ft (8.5 m) Tips for Towing • Continually communicate with the pilot of the sailplane to make the pilot aware when you are turning, are having difficulty, or need the tow line released. • Be sure that the sailplane pilot keeps the wings level at all times. The sailplane pilot should not try to turn the aircraft, he should allow the tow plane to drag the aircraft around the turns. • Avoid slack in the line while flying.
EN Optional Float Installation 1. Remove all 4 screws and the cover plates from the bottom of the fuselage. Keep these materials to reuse in step 4. 2. Carefully remove and retain the landing gear from the fuselage. 3. Push the square loops of the front and rear float struts into the slots in the bottom of the fuselage. 4.
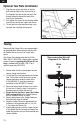
EN Flying Tips and Repairs Flying We recommend flying your E-flite® UMX Carbon Cub SS outside in no greater than moderate winds or inside in a large gymnasium. Always avoid flying near houses, trees, wires and buildings. You should also be careful to avoid flying in areas where there are many people, such as busy parks, schoolyards or soccer fields. Consult local laws and ordinances before choosing a location to fly your aircraft.
EN Additional Safety Precautions and Warnings As the user of this product, you are solely responsible for operating it in a manner that does not endanger yourself and others or result in damage to the product or the property of others. This aircraft is controlled by a radio signal subject to interference from many sources outside your control.
EN Service of Power Components Disassembly CAUTION: DO NOT handle propeller parts while the flight battery is connected. Personal injury could result. Propeller A 1. Remove the spinner (A) from the propeller (B). B Since the propeller and spinner are glued together, glue residue will need to be cleaned from the spinner or propeller when these parts are used again. D 2. Carefully remove the screw (C) and propeller (B) from the motor shaft (D). A propeller spacer is installed on the motor shaft.
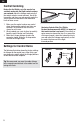
EN Opening the Fuselage When the fuselage must be opened for access to the motor, servos or receiver: 1. At the fuselage, push the left and right struts (marked L and R) forward, then pull the struts from the fuselage. 2. Push the struts together until they pull free from the wing. 3. Carefully cut the tape or decals to open the fuselage. NOTICE: Removing tape or decals can remove paint from the fuselage. 2 1 4. Carefully separate the upper fuselage and wings from the lower fuselage.
EN Troubleshooting Guide (Continued) Problem Aircraft will not respond to throttle but responds to other controls Extra propeller noise or extra vibration Reduced flight time or aircraft underpowered Possible Cause Throttle stick and/or throttle trim too high Throttle channel is reversed Reverse throttle channel on transmitter Motor disconnected from receiver Open fuselage and make sure motor is connected to the receiver Damaged propeller, spinner or motor Replace damaged parts Prop screw is too lo
EN Limited Warranty What this Warranty Covers Horizon Hobby, Inc. (“Horizon”) warrants to the original purchaser that the product purchased (the “Product”) will be free from defects in materials and workmanship at the date of purchase.
EN website http://www.horizonhobby.com/content/_servicecenter_render-service-center. ATTENTION: Horizon service is limited to Product compliant in the country of use and ownership. If received, a non-compliant Product will not be serviced. Further, the sender will be responsible for arranging return shipment of the un-serviced Product, through a carrier of the sender’s choice and at the sender’s expense.
Replacement Parts – Ersatzteile Piéces de rechange – Recapiti per i ricambi Part # • Nummer Numéro • Codice Description Beschreibung Description Descrizione EFLUP050275 5 x 2.75 Electric Propeller 5 x 2.
Part # • Nummer Numéro • Codice Description Beschreibung Description Descrizione 2.3-Gram Linear Long Throw Offset Servo (Ailerons) 2,3 Gramm Linear Offest Servo (Querruder) Servo linéaire offset course longue 2,3 g (Ailerons) Servo di offset corsa lunga lineari a prestazioni elevate da 2,3 grammi (Alettoni) SPM6836 Replacement Servo Mechanics: 2.
– Parts Contact Information – – Intaktinformationen für Ersatzteile – – Coordonnés pour obtenir de piéces détachées – – Recapiti per i ricambi – Country of Purchase Horizon Hobby Address Phone Number/Email Address Sales 4105 Fieldstone Rd Champaign, Illinois, 61822 USA 800-338-4639 sales@horizonhobby.com United Kingdom Horizon Hobby Limited Units 1-4 Ployters Rd Staple Tye Harlow, Essex CM18 7NS, United Kingdom +44 (0) 1279 641 097 sales@horizonhobby.co.
© 2013 Horizon Hobby, Inc. UMX, AS3X, E-flite, JR, Celectra, DSM, DSM2, ModelMatch and Bind-N-Fly are trademarks or registered trademarks of Horizon Hobby, Inc. DSMX is a trademark of Horizon Hobby, Inc., registered in the U.S.. The Spektrum trademark is used with permission of Bachmann Industries, Inc. Futaba is a registered trademark of Futaba Denshi Kogyo Kabushiki Kaisha Corporation of Japan.