® UMX BEAST 3D ™ Instruction Manual Bedienungsanleitung Manuel d’utilisation Manuale di Istruzioni
EN NOTICE All instructions, warranties and other collateral documents are subject to change at the sole discretion of Horizon Hobby, Inc. For up-to-date product literature, visit www.horizonhobby.com and click on the support tab for this product.
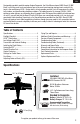
EN Designed by aerobatic world champion Quique Somenzini, the Ultra Micro extreme (UMX) Beast® 3D BNF Basic is a thrilling small-scale recreation of one of the most awe-inspiring airplanes ever created. At its heart is the revolutionary AS3X™ System built in to help provide you with a true 3D experience, the ability to fly indoors, and handle windy conditions outdoors. The added punch of its stronger 2500Kv, 180BL outrunner motor delivers an outstanding thrust to weight ratio.
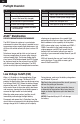
EN Preflight Checklist 1. Charge flight battery. 6. Adjust flight controls and transmitter. 2. Install flight battery in the aircraft (once it has been fully charged). 7. Perform a radio system Range Check. 3. Bind aircraft to your transmitter. 8. Find a safe and open area. 4. Make sure linkages move freely. 9. Plan flight for flying field conditions. 5. Perform Control Direction Test with the transmitter.
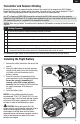
EN Transmitter and Receiver Binding Binding is the process of programming the receiver of the control unit to recognize the GUID (Globally Unique Identifier) code of a single specific transmitter. You need to ‘bind’ your chosen SpektrumTM DSM2TM/ DSMX ® technology equipped aircraft transmitter to the receiver for proper operation. Any JR® or Spektrum DSM2/DSMX transmitter can bind to the EFLU4864 receiver.
EN Arming the ESC 1 Lower throttle and throttle trim to lowest settings. Power on the Transmitter then wait 5 seconds. 2 3 Install flight battery and connect it to the ESC. Keep plane immobile on its wheels away from wind for five seconds. Series of tones Continuous LED If you accidentally connect the battery while the throttle is fully raised, the ESC will enter programming mode. Disconnect the battery immediately.
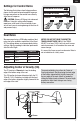
EN Settings for Control Horns The following illustrations show linkage positions chosen for the most balanced aerobatic response. Linkage connections on the control horns directly affect aircraft response. CAUTION: Extreme 3D flying is for advanced modelers. Using this setting without proper experience, could result in loss of control of your aircraft and a crash, causing damage to the aircraft and personal injury.
EN Flying Tips and Repairs Flying While the Beast 3D may be flown indoors in an open space such as a gymnasium, we recommend flying your Beast 3D outside in no greater than moderate winds. Always avoid flying near houses, trees, wires and buildings. You should also be careful to avoid flying in areas where there are many people, such as busy parks, schoolyards or soccer fields. Consult local laws and ordinances before choosing a location to fly your aircraft.
EN Additional Safety Precautions and Warnings As the user of this product, you are solely responsible for operating in a manner that does not endanger yourself and others or result in damage to the product or the property of others. This model is controlled by a radio signal subject to interference from many sources outside your control.
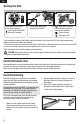
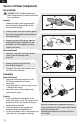
EN Service of Power Components Disassembly CAUTION: DO NOT handle propeller parts while the flight battery is connected. Personal injury could result. B Propeller 1. Remove the battery hatch by gripping the front of the hatch, then pulling it up and away from the fuselage. 2. Carefully loosen screw (A) inside the spinner, then remove the propeller assembly (B) from the motor shaft (C). C A D F E 3. Remove the spinner (D) and glue from the backplate (E) to free the propeller (F) and backplate.
EN Troubleshooting Guide AS3X Problem Possible Cause Solution Control surfaces are Control surfaces may not have been not at neutral position mechanically centered from factory when transmitter Aircraft was moved after the flight battery controls are at neutral was connected and before sensors initialized Center control surfaces mechanically by adjusitng the U-bends on control linkages Model flies inconsistently from flight to flight Neutralize trims and mechanically adjust linkages to center control sur
EN Troubleshooting Guide (Continued) Problem Control surface does not move Possible Cause Solution Control surface, control horn, linkage or servo damage Replace or repair damaged parts and adjust controls Wire damaged or connections loose Check wires and connections, connect or replace as needed Flight battery charge is low Fully recharge flight battery Control linkage does not move freely Make sure control linkage moves freely Controls reversed Transmitter settings reversed Perform Control Di
EN Warranty and Repair Policy What this Warranty Covers Horizon Hobby, Inc. (“Horizon”) warrants to the original purchaser that the product purchased (the “Product”) will be free from defects in materials and workmanship at the date of purchase.
EN Warranty and Service Information Country of Purchase Horizon Hobby Address Phone Number/Email Address Horizon Service Center (Electronics and engines) 4105 Fieldstone Rd Champaign, Illinois 61822 USA 877-504-0233 Online Repair Request visit: www.horizonhobby.com/service Horizon Product Support (All other products) 4105 Fieldstone Rd Champaign, Illinois 61822 USA 877-504-0233 productsupport@horizonhobby.
– Parts Contact Information – – Intaktinformationen für Ersatzteile – – Coordonnés pour obtenir de piéces détachées – – Recapiti per i ricambi – Country of Purchase Horizon Hobby Address Phone Number/Email Address United States Sales 4105 Fieldstone Rd Champaign, Illinois, 61822 USA 800-338-4639 sales@horizonhobby.com United Kingdom Horizon Hobby Limited Units 1-4 Ployters Rd Staple Tye Harlow, Essex CM18 7NS, United Kingdom +44 (0) 1279 641 097 sales@horizonhobby.co.
Part # • Nummer Numéro • Codice Description Beschreibung Description Descrizione Firewall: UMX Beast Brandschott UMX Beast Support moteur: UMX Beast Ordinata: UMX Beast EFLU4067 Prop Adaptor: UMX Beast Prop Adaptor: UMX Beast Adaptateur d’hélice: UMX Beast Adattatore elica: UMX Beast EFLUC1007 Celectra 2S 7.4V DC Celectra 2S 7.4V DC Li-Po Charger Li-Po Ladegerät Chargeur Celectra DC 7.4V 2S Celectra 2S 7.
– Optional Parts and Accessories – – Optionale Bauteile und Zubehörteile – – Piéces optionnelles et accessoires – – Parti opzionali e accessori – Part # • Nummer Description Numéro • Codice Beschreibung Description Descrizione EFLA700UM Charger Plug Adapter: EFL Ladekabel Adapter EFL Prise d’adaptation chargeur: EFL Adattatore per la carica: EFL EFLA7001UM Charger Plug Adapter: TP Ladekabel Adapter TP Prise d’adaptation chargeur: TP Adattatore per la carica: TP EFLU4068 Harness Adapter: UMX Be
Part # • Nummer Description Numéro • Codice Beschreibung Description Descrizione SPM7800 DX7s DSMX 7-Channel Transmitter Mode 2 Spektrum DX7s 7 Kanal Sender Emetteur DX7s DSMX 7 voies Mode 2 DX7s DSMX Trasmettitore 7 canali Mode 2 SPM7800EU DX7s DSMX 7-Channel Transmitter Mode 2 (EU) Spektrum DX7s 7 Kanal Sender Emetteur DX7s DSMX 7 voies Mode 2 (EU) DX7s DSMX Trasmettitore 7 canali Mode 2 (EU) SPM78001AU DX7s DSMX 7-Channel Transmitter Mode 1 (AU) DX7s DSMX 7-Channel Transmitter Mode 1 (AU)
© 2012 Horizon Hobby, Inc. E-flite, AS3X, UMX, JR, Celectra, DSM2, DSMX and ModelMatch are trademarks or registered trademarks of Horizon Hobby, Inc. The Spektrum trademark is used with permission of Bachmann Industries, Inc. Beast® and its design are either registered trademarks or trademarks of Kevin Kimball, used under license to Horizon Hobby, Inc.The trim scheme of the Beast® was designed by Mirco Pecorari of Aircraft Studio Design.