
User Manual

EN
Timber
Model Assembly Continued
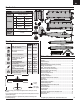
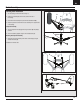
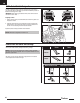
Float Installation (Optional)
Float Assembly
1. Install the 2 cross members (A) to the left and right floats as shown..
2. Install the front and rear float struts to the floats and secure the assembly
together using the included 4 float plates (B) and screws (C). The front strut
has slightly more of an angle than the rear strut. (Figure 1)
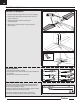
3. Install the front support members (D) as shown using the included
screws (E).
Float Assembly Installation
1. Align and mount the float set assembly to the bottom of the fuselage.
2. Secure the back section of the floats to the fuselage using the included
bracket (F) and 2 screws (G).
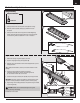
3. Secure the front section of the floats using the two included screws (H) to
secure the front support members to the bottom of the fuselage.
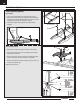
4. Attach the included wire from each float rudder (I) to the pull–pull horn (J)
using the two included pins (K).
Disassemble in reverse order.
A
B
C
D E
F
G
H
I
J
Fig. 1
Front Strut
K
8