
User Manual


EN
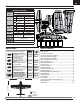
Model Assembly Continued
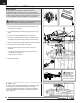
Motor and Propeller Installation
1. Install the motor with X-mount (aa) on the fuselage using 4 screws (bb)
from bag C.
2. Correctly align and connect the motor wire colors with the ESC wires.
Ensure motor spins in the correct direction.
3. Install the cowling (cc) on the fuselage using 3 screws (dd) from bag E.
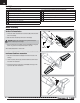
4. Install the propeller (ee) and spinner nut (ff) on the prop shaft. Use a tool
through the spinner nut to tighten.
IMPORTANT: The propeller size numbers (14.75 x 10) must face out from the
motor for correct propeller operation. Ensure the nut holds the propeller tightly
without damaging the propeller.
Disassemble in reverse order. Not all wiring shown.
NOTICE: If the propeller is not balanced, the aircraft may vibrate, causing the
stabilization system to not operate correctly and/or decrease the life of the
servos.
Horizon Hobby does not warrant replacement if the servos are used under
extreme vibration or the stabilization system is used with an unbalanced
propeller.
For more information, view our propeller balancing video on Horizon Hobby’s
Youtube channel https://www.youtube.com/watch?v=OXuNnYQO2s4
NOTICE: Remove the propeller before radio system setup or accidental
injury may occur.
bb
cc
aa
ff
ee
dd
7