
User Manual
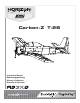


EN
®
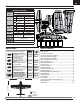
Prefl ight
1 Remove and inspect contents.
2 Read this instruction manual thoroughly.
3 Charge the fl ight battery.
4 Fully assemble the airplane.
5 Install the fl ight battery in the aircraft (once it has been fully charged).
6 Check the Center of Gravity (CG).
7 Bind the aircraft to your transmitter.
8 Make sure linkages move freely.
9 Perform the Control Direction Test with the transmitter.
10 Perform the AS3X Control Direction Test with the aircraft.
11 Adjust fl ight controls and transmitter.
12 Perform a radio system Range Test.
13 Find a safe open area to fl y.
14 Plan fl ight for fl ying fi eld conditions.
®
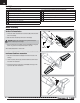
Model Assembly
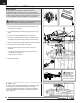
Vertical Tail Installation
1. Connect the rudder and elevator servo connectors (aa) to the servo exten-
sions in the fuselage.
2. Slide the vertical tail assembly into the slot in the fuselage.
CAUTION: DO Not crush or damage the wiring when attaching the
vertical tail assembly to the fuselage.
3. Secure the assembly to the fuselage using 2 screws (bb) (from Bag A) as
shown. Long screw in front hole, shorter screw in rear hole.
When needed, disassemble in reverse order.
Horizontal Stabilizer Installation
1. Slide the horizontal stabilizer tube (aa) into the hole in the rear of the
fuselage.
2. Install the 2 piece (left and right) horizontal stabilizer as shown. Ensure
the control horn faces down.
3. Secure the 2 piece tail in place with 2 screws (bb) (from bag B) in the
top of each side of the horizontal tail.
aa
bb
aa
bb
iSii i
4