
User Manual


EN
®
Flying Tips and Repairs
Consult local laws and ordinances before choosing a fl ying location.
Flying Field
Always choose a wide-open space for fl ying your aircraft. It is recommended
that you fl y at a designated RC fl ying fi eld. Always avoid fl ying near houses,
trees, wires and buildings. Avoid fl ying in areas where there are many people,
such as parks, schoolyards, or soccer fi elds.
Range Check your Radio System
Before you fl y, range check the radio system. Refer to your specifi c transmitter
instruction manual for range test information.
Understanding Oscillation
Once the AS3X system is active (after advancing the throttle for the fi rst time),
you will normally see the control surfaces react to aircraft movement. In
some fl ight conditions, you will see oscillation. If oscillation occurs, decrease
airspeed. If oscillation persists, refer to the Troubleshooting Guide for more
information.
Takeoff
Place the aircraft in position for takeoff (facing into the wind). Set your trans-
mitter in low rate and gradually increase the throttle from ¾ to full and steer
with the rudder. As the airplane gains speed, gently pull back on the elevator
and climb to a comfortable altitude. You may also set fl aps to half travel for
shorter takeoffs.
Flying
Fly the airplane and trim it for level fl ight at ¾ throttle with fl aps up. After
adjusting trim in fl ight do not touch the control sticks for 3 seconds. This allows
the receiver to learn the correct settings to optimize AS3X performance.
Landing
Tip: To prevent damage to the landing gear doors, it is recommended to
remove them when landing in tall grass.
Make sure to land the aircraft into the wind. Start to slow the model down to
an approach speed and set the fl aps to half travel. If landing in windy condi-
tions, land at half fl ap travel. If fl ying in light winds, set fl aps to full for fi nal
approach. With fl aps and retracts extended, fl y the aircraft to approximately
36 inches (90 cm) or less above the runway, using a small amount of throttle
for the entire descent. Keep the throttle on until the aircraft is ready to fl are.
During fl are, keep the wings level and the aircraft pointed into the wind. Gently
lower the throttle while pulling back on the elevator to bring the aircraft down
on its wheels.
Refer to the Dual Rates and expo chart for proper fl ap to elevator mix to help
reduce the pitching tendency from fl aps.
NOTICE: When using fl aps with this airplane, down elevator to fl ap mixing is
required. Failure to do so may result in loss of control or a crash.
NOTICE: If a crash is imminent, reduce the throttle and
trim fully. Failure to do so could result in extra damage
to the airframe, as well as damage to the ESC and
motor.
NOTICE: After any impact, always ensure the receiver
is secure in the fuselage. If you replace the receiver,
install the new receiver in the same orientation as the
original receiver or damage may result.
NOTICE: Crash damage is not covered under warranty.
NOTICE: When you are fi nished fl ying, never leave the airplane in direct sun-
light or a hot, enclosed area such as a car. Doing so can damage the foam.
Low Voltage Cutoff (LVC)
When a Li-Po battery is discharged below 3V per cell, it will not hold a charge.
The ESC protects the fl ight battery from over-discharge using Low Voltage
Cutoff (LVC). Before the battery charge decreases too much, LVC removes
power supplied to the motor. Power to the motor pulses, showing that some
battery power is reserved for fl ight control and safe landing.
Disconnect and remove the Li-Po battery from the aircraft after use to prevent
trickle discharge. Charge your Li-Po battery to about half capacity before stor-
age. During storage, make sure the battery charge does not fall below 3V
per cell. LVC does not prevent the battery from over-discharge during storage.
NOTICE: Repeated fl ying to LVC will damage the battery.
Tip: Monitor your aircraft battery’s voltage before and after fl ying by using a
Li-Po Cell Voltage Checker (EFLA111, sold separately).
Repairs
Thanks to the Z-Foam
™
material in this aircraft, repairs to the foam can be
made using virtually any adhesive (hot glue, regular CA, epoxy, etc). When parts
are not repairable, see the Replacement Parts List for ordering by item number.
For a listing of all replacement and optional parts, refer to the list at the end of
this manual.
NOTICE: Use of CA accelerant on your aircraft can damage paint. DO NOT
handle the aircraft until accelerant fully dries.
WARNING:
Always decrease
throttle at propeller
strike.
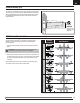
In Flight Trimming
During your fi rst fl ight, trim the aircraft for level fl ight at 3/4 throttle. Make
small trim adjustments with your transmitter’s trim switches to straighten the
aircraft’s fl ight path.
After adjusting trim do not touch the control sticks for 3 seconds. This al-
lows the receiver to learn the correct settings to optimize AS3X performance.
Failure to do so could affect fl ight performance.
3 Seconds
12