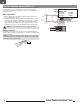
Turbo Timber® Evolution 1.5m Scan the QR code and select the Manuals and Support quick links from the product page for the most up-to-date manual information. Scannen Sie den QR-Code und wählen Sie auf der Produktseite die Quicklinks Handbücher und Unterstützung, um die aktuellsten Informationen zu Handbücher. Scannez le code QR et sélectionnez les liens rapides Manuals and Support sur la page du produit pour obtenir les informations les plus récentes sur le manuel.
EN NOTICE All instructions, warranties and other collateral documents are subject to change at the sole discretion of Horizon Hobby, LLC. For up-to-date product literature, visit horizonhobby.com or towerhobbies.com and click on the support or resources tab for this product.
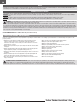
EN Quick Start Information Transmitter Setup Dual Rates* Flap Travel 1. Blank (Acro) Model 2. Wing Type: 1 Aileron, 1 Flap 3. Servo Reversing: All Channels Normal 4.
EN SAFE® Select Technology BNF The BNF Basic version of this airplane includes SAFE Select technology which can offer an extra level of protection in flight. Use the following instructions to make the SAFE Select system active and assign it to a switch. When enabled, SAFE Select prevents the airplane from banking or pitching past predetermined limits, and automatic self-leveling keeps the airplane flying in a straight and level attitude when the aileron, elevator and rudder sticks are at neutral.
EN WARNING: Assemble the aircraft, program your radio control system, bind the aircraft, and verify correct operation before installing the propeller. Never attempt to program the radio components, assemble the aircraft or perform maintenance of any kind without removing the propeller or engaging throttle cut. Serious injury could result if the motor starts inadvertently with the propeller still attached. Model Assembly Landing Gear Installation M2.
EN Receiver Selection and Installation PNP The recommended receiver for this aircraft is the Spektrum AR637T. If you choose to install a different receiver, ensure that it is at least a 6-channel full range receiver. Refer to the manual of your chosen receiver for correct installation and operation instructions. AR637T Installation 1. Attach the appropriate control surfaces to the their respective ports on the receiver using the table at the right. 2.
EN General Binding Tips and Failsafe BNF • The included receiver has been specifically programmed for operation of this aircraft. Refer to the receiver manual for correct setup if the receiver is replaced. • Keep away from large metal objects while binding. • Do not point the transmitter’s antenna directly at the receiver while binding. • The orange LED on the receiver will flash rapidly when the receiver enters bind mode.
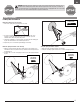
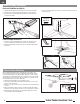
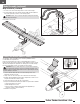
EN Model Assembly (continued) Horizontal Stabilizer Installation 1. Slide the horizontal stabilizer joiner (A) into the hole in the rear of the fuselage. 2. Flex each of the elevators back and forth several times to break in the hinge. 4. Secure the horizontal stabilizer pieces in place using the two included 3 x 12 mm self tapping screws (B). 3. Install the two piece (left and right) horizontal stabilizer as shown. Ensure the control horn faces down.
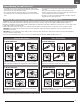
EN Model Assembly (continued) Wing Assembly Choose to assemble the wing with or without the leading edge slats to suit your flying style. For optimized high speed performance we recommend flying without the slats. For maximum slow speed performance we recommend installing the slats. With Slats Without Slats 1. Carefully remove all the foam slat pocket covers (A) from the wing. 1. Locate the rectangular decals on the decal sheet 2.
EN Model Assembly (continued) Wing Installation (continued) 3. Insert the connectors from the wings into the sockets on the fuselage. 4. Insert the leading edge of the wing into the wing saddle, and then tighten the M6 x 30mm nylon wing screws to secure the wing in place. CAUTION: DO NOT crush or otherwise damage the wiring when attaching the wing to the fuselage. Disassemble in reverse order.
EN Integrated ESC Telemetry BNF: This aircraft includes telemetry between the ESC and receiver, which can provide information including RPM, voltage, motor current, throttle setting (%), and FET (speed controller) temperature. PNP: The ESC in this aircraft is capable of delivering telemetry information over the throttle connection when paired with a Smart compatible Spektrum telemetry receiver. It will function with a normal PWM servo siganl for common radio control systems.
EN Flaps Flaps Control Horn and Servo Arm Settings The table to the right shows the factory settings for the control horns and servo arms. Fly the aircraft at factory settings before making changes. NOTICE: If control throws are changed from the factory settings, the AR637T gain values may need to be adjusted. Refer to the Spektrum AR637T manual for adjustment of gain values.
EN AS3X® Control Response Test BNF WARNING: Do not perform any testing or maintenance with the propeller installed on the aircraft. Serious injury or property damage could result from the motor starting inadvertently. 1. Raise the throttle just above 25%, then lower the throttle to activate AS3X technology. WARNING: Keep all body parts, hair and loose clothing away from spinning motor, as these items could become entangled.
EN Dual Rates and Control Throws Program your transmitter to set the rates and control throws to the values given. These values have been tested and are a good starting point to achieve successful flight. After flying, you may choose to adjust the values for the desired control response.
EN In Flight Trimming BNF During your first flight, trim the aircraft for level flight at 3/4 throttle with flaps up. Make small trim adjustments with your transmitter’s trim switches to straighten the aircraft’s flight path. After adjusting the trim, do not touch the control sticks for 3 seconds. This allows the receiver to learn the correct settings to optimize AS3X performance. Failure to do so could affect flight performance. 3 Seconds Post Flight 1. 2. 3. 4.
EN Troubleshooting Guide Problem Aircraft will not respond to throttle but responds to other controls Extra propeller noise or extra vibration Reduced flight time or aircraft underpowered Possible Cause Throttle not at idle and/or throttle trim too high Throttle servo travel is lower than 100% Throttle channel is reversed Motor disconnected from ESC Damaged propeller and spinner, collet or motor Propeller is out of balance Prop nut is too loose Flight battery charge is low Propeller installed backwards F
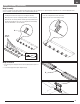
EN Float Installation (Optional) Float Assembly A 1. Install the 2 cross members (A) to the left and right floats as shown. 2. Install the front and rear float struts to the floats and secure the assembly together using the included 4 float plates (B) and M2.5 x 25mm machine screws (C). The front strut has slightly more of an angle than the rear strut (Figure 1). 3. Install the front support members (D) as shown using the included self tapping screws (E).
EN Thrust Reversing (Optional) The Avian™ Smart ESC in this aircraft is equipped with thrust reversing, but it must be enabled before it will function. Reversing the motor can be helpful when taxiing or for shortening ground roll after a landing. Flipping the designated switch reverses motor rotation, throttle will still control motor speed. WARNING: Never attempt to use thrust reversing in flight. Applying reverse thrust while in flight will result in loss of control and possibly a crash.
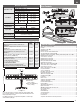
EN Replacement Parts Part # EFL105251 EFL105252 EFL105253 EFL105254 EFL105255 EFL105256 EFL105257 EFL105258 EFL17553 EFL17556 EFL5255 EFL5256 EFL5258 EFL5259 EFL5260 EFL5261 EFL5263 EFL5265 EFL5268 EFL5269 EFL5962 EFLA521 EFLM17552 SPMAR637T SPMSA370 SPMXAE1060 Description Fuselage: Turbo Timber Evolution Wing Set: Turbo Timber Evolution Battery Hatch: Turbo Timber Evolution Landing Gear: Turbo Timber Evolution Gear Retainer: Turbo Timber Evolution Decal Sheet: Turbo Timber Evolution Wing Plug Set: Turbo
EN Limited Warranty What this Warranty Covers Horizon Hobby, LLC, (Horizon) warrants to the original purchaser that the product purchased (the “Product”) will be free from defects in materials and workmanship at the date of purchase.
EN FCC Information FCC ID: BRWTIARLGTNG1 This equipment complies with FCC and IC radiation exposure limits set forth for an uncontrolled environment. This equipment should be installed and operated with minimum distance 20cm between the radiator and/or antenna and your body (excluding fingers, hands, wrists, ankles and feet). This transmitter must not be colocated or operating in conjunction with any other antenna or transmitter.
© 2021 Horizon Hobby, LLC. E-flite, Avian, DSM, DSM2, DSMX, Bind-N-Fly, BNF, the BNF logo, Plug-N-Play, AS3X, SAFE, the SAFE logo, ModelMatch, IC3, EC3, and the Horizon Hobby logo are trademarks or registered trademarks of Horizon Hobby, LLC. The Spektrum trademark is used with permission of Bachmann Industries, Inc. All other trademarks, service marks and logos are property of their respective owners. US 8,672,726. US 9,056,667. US 9,753,457. US 9,930,567. US 10,078,329. US 10,419,970. US 10,849,013.