
User Manual

EN
®
Transmitter Setup
Transmitter Setup Checklist
Before binding for Computerized Transmitters (DX6i, DX7/DX7se,
DX7s, DX8, DX10t, DX18):
1. Choose a blank model memory.
2. Choose Wing/Aircraft Type for single aileron servo.
3. Enable the Flap funtion in your Transmitter
4. Set all trim and sub-trims to NEUTRAL (0%).
5 Set servo travel values to Quique’s recommended settings.
6. Set the Dual Rate value according to the Dual Rate and Expo
chart.
7. Set fl ap-elevator mixing
After binding:
1. DO NOT use sub-trims to make fi ne adjustments. Off-center
subtrim will affect servo travel and AS3X operation.
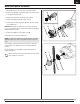
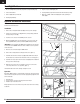
2. Adjust linkage lengths so the control surfaces center when the
servo arm is close to perpendicular
CAUTION: For safe operation, always re-bind the airplane after
setup is complete to ensure the failsafe is updated with the latest
setup.
IMPORTANT: The AR635 receiver’s default setting in this aircraft is normal
mode. We recommend that you do not change this setup. Refer to the receiver
manual for more information.
A programmable DSM2/DSMX six-channel (or better) transmitter with Dual
Rates is required for fl ying this aircraft with fl aps and the optional tow release.
The Spektrum
™
DX6i, DX7s, DX8, DX10t, DX18 and JR
®
X9503, 11X or 12X
transmitters may be used.
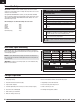
Below are Quique’s recommended settings for Servo Travel.
Throttle 100%
Aileron 125%
Elevator 125%
Rudder 125%
Channel 5 100%
Channel 6 (Flaps) 125%
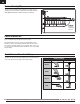
Dual Rates, Expos and Mixing
Adjust rate and expo to the recommended values shown in the chart below.
We recommend mixing fl aps to down elevator 42% to reduce pitch up tenden-
cies during fl ap operation.
NOTICE: To ensure AS3X functions properly, do not lower rate values below
50%. If lower rates are desired, manually adjust the position of the pushrods
on the servo arm.
IMPORTANT: If oscillation occurs at high speed, refer to the Troubleshooting
Guide for more information.
Dual Rate High Rate
Expo
Low Rate
Expo
Aileron 100%
0%
70%
0%
Elevator 100%
0%
70%
0%
Rudder 100%
0%
70%
0%
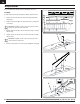
Prefl ight Preparation
1. Remove and inspect contents.
2. Charge fl ight battery.
3. Read this instruction manual thoroughly.
4. Fully assemble airplanes.
5. Install the fl ight battery in the aircraft (once it has been fully charged).
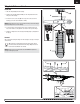
6. Check the Center of Gravity (CG)
7. Bind aircraft to your transmitter.
8. Make sure linkages move freely.
9. Perform the Control Direction Test with the transmitter.
10. Perform the AS3X Control Direction Test with the aircraft.
11. Adjust fl ight controls and transmitter.
12. Perform a radio system Range Check.
13. Find a safe and open area.
14. Plan fl ight for fl ying fi eld conditions.
Channel Flaps (Master) Down Elevator (Slave)
Mix Value
(Linear)
100% 42%
Flaps Speed
2 seconds
16