
Apprentice S 15e RTF with DXe Manual


EN
Before each fl ying session, and especially with a new model, you should
perform a range check. The DXe incorporates a range testing system. Placing
the transmitter in RANGE CHECK mode reduces the output power, allowing a
range check.
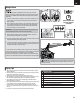
1. Power on the transmitter for 5 seconds or more with the throttle stick and
trim low. Power on the ESC Switch and keep the aircraft immobile for at
least 5 seconds.
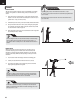
2. Face the model with the transmitter in your normal fl ying position. Turn on
your transmitter then toggle the HI/LO rate swtich 4 times. Immediately
press and hold the trainer button. The LEDs will fl ash and the alarm will
sound. The system is in range check mode.
IMPORTANT: You must hold the trainer switch during the entire range check
process. Releasing the switch will exit the range check mode.
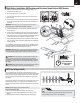
3. With the system powered on and the model restrained on the ground*,
stand 28 meters (90 feet) away from the model.
4. Move the transmitter rudder, elevator, aileron and throttle controls to ensure
they operate smoothly at 28 meters (90 feet).
5. If control issues exist, do not attempt to fl y. Refer to the contact table at the
end of the this manual to contact Horizon Hobby product support. Also, see
the Spektrum website for more information.
* In some aircraft, when the model is placed on the ground, the antenna(s) can
be within inches of the ground. Close proximity of the antenna(s) to the ground
can reduce the effectiveness of the range check. If you experience
issues during the range check, restrain the model on a non-conductive stand
or table up to 2ft (60cm) above the ground, then range check the system again.
28 meters (90 feet)
CAUTION: While holding the aircraft during the Range Test, always keep
body parts and loose items away from the propeller. Failure to do so could
cause personal injury.
Range Check
Flying Tips
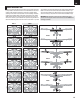
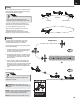
Mode 2 Mode 1
13
24
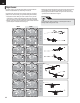
• Start in beginner mode. As you learn and become more confi dent, change
modes to advance.
• Resist the desire to fl y at full throttle. Flying slowly at fi rst allows for greater
response time should anything go wrong.
• Always keep your aircraft in plain sight and up wind from you.
• Gain experience by fi rst fl ying in large circles high off the ground. Once you
feel comfortable, gradually progress to more advanced maneuvers.
• Do not attempt your fi rst turn at low altitude. Higher altitudes allow for
greater possibility of correction.
• Control stick movements are quite sensitive. Avoid pushing the control sticks
to their endpoints until you become more familiar with your aircraft.
• To recover from a nose dive, decrease throttle and release the aileron
stick. Pull the elevator stick back a small amount to pull up the nose of the
aircraft.
• If you feel you have lost control press and hold the Panic Button.
9
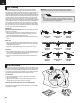
Prefl ight Checklist
1. Charge fl ight battery.
2. Install fl ight battery in aircraft (once it has been fully charged).
3. Make sure linkages move freely.
4. Perform Control Direction Test with transmitter.
5. Make sure control surfaces are centered.
6. Find a safe and open area.
7. Perform a radio system Range Check.
8. Plan fl ight for fl ying fi eld conditions.
Keep immobile and
out of the wind for
5 seconds
17