DynoRaxx® EVOLUTION PR Quick Guide Installation Steps P u b l i c a t i o n N u m b e r 1 0 0 6 1 1 8 6 6 . 6 2 0 . 2 4 1 0 | d y n o r a x x .
DynoRaxx Evolution PR Quick Guide Installation Steps Installer Responsibilities: Thank you for choosing Evolution PR, a revolutionary technology for Pitched-‐Roof Racking for PV Mounting. Evolution PR pitched-‐roof solar racking system is designed and engineered for commercial and residential solar racking applications.
DynoRaxx Evolution PR Quick Guide Installation Steps Evolution PR Installation Instructions: Evolution PR is easily adaptable to a variety of site plans, allowing flexibility to work around mild obstacles and gives leeway to human error in array alignment.
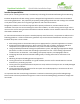
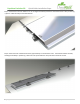
DynoRaxx Evolution PR Quick Guide Installation Steps Step 3: After positioning the Evolution PR, take off the butyl mastic tape and secure its position onto the roof. Taking the TEK self-‐tapping screws, attach them to the roof through the designated holes.
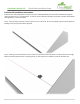
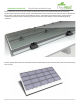
DynoRaxx Evolution PR Quick Guide Installation Steps Step 5: Position the first solar module so a ¼ of its length extends beyond the first two bottom bases. After positioning it, place it under the clamps of the Evolution PR.
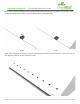
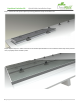
DynoRaxx Evolution PR Quick Guide Installation Steps Step 7: Secure the solar panel in place by screwing down the clamps on the base row. Step 8: Repeat steps 5-‐7 until first column has all modules placed.
DynoRaxx Evolution PR Quick Guide Installation Steps Step 9: When the end of the column has been reached, attach the last set of Evolution PR bases by positioning the deck screw holes under the last module.