
Installation Manual


STAGE ONE INSTRUCTIONS
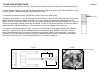
1. Remove vacuum slide from the carb. Remove stock needle & spacers, noting order of assembly (Fig. A).
2. Install Dynojet needle on groove #3 for applications below 3000 feet, groove #2 for above 3000 feet, using
all stock spacers. Install the Dynojet washer above the E-clip.
3. Install the Dynojet slide spring (DSP007M) in place of the stock slide spring.
4. Remove stock main jet. If you are running the stock exhaust use the DJ142 below 3000 feet, DJ138 from
3000 to 6000 feet and DJ134 above 6000 feet. If you are running an aftermarket exhaust with a Quiet
baffle, use the DJ144 below 3000 feet, DJ140 from 3000 to 6000 feet and DJ136 above 6000 feet. If you are
running an aftermarket exhaust with a High flow baffle, use the DJ146 below 3000 feet, DJ142 from 3000 to
6000 feet and DJ138 above 6000 feet. Be sure that the jet you are changing is the main jet.
5. Locate the Fuel Mixture Screw (Fig.B). If you see a screw head at Fig. B then proceed to the adjusting
procedure. With the 5/32 drill bit provided carefully drill through the plug. NOTE: The mixture screw is
directly underneath this plug, be ready to pull back on the drill the instant you break through. Use screw
provided to secure and remove this plug. Using a flat blade screwdriver, turn the mixture screw clockwise
until it seats, then turn out 1.5 turns below 3000 feet or 1 turn above 3000 feet.
Fig.A
Q515.001
This is Groove # 1
Fig.B
Dynojet Parts
Stock Parts
Mixture Screw Location
Main Jet Location