
Installation Guide User Manual

DYNO INSTALLATION AND SETUP
Tire Carriage
Version 3 Motorcycle Dynamometer Installation Guide
1-9
. . . . . . . . . . . . . . . . . . . . . . . . . . . . . . . . . . .
TIRE CARRIAGE
The tire carriage is fastened to the bottom of the crate next to the dyno. Refer to
step 4 on page 1-5 for instructions on removing the tire carriage from the crate.
INSTALLING THE TIRE CARRIAGE
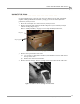
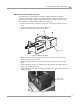
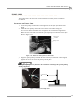
1 Loosen the bolts securing the three carriage clamps and nut block to the top of
the dyno using a 1/2-inch socket, open or box end wrench.
Figure 1-10: Tire Carriage—Loosen the Clamps and Nut Block
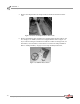
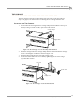
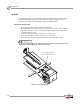
2 Slide the carriage under the carriage clamps and the nut block until the carriage
screw is touching the nut block as shown in Figure 1-11.
3 Slide the hand crank onto the end of the carriage screw.
4 Secure the hand crank to the screw shaft by tightening the set screw using a
5/32-inch allen wrench.
Figure 1-11: Tire Carriage—Secure the Hand Crank
nut block
carriage clamps
hand crank
nut block
carriage screw