
Manual


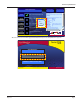

5. Insert the USB Update Drive into the USB port on the rear of the DXN and wait 30 seconds for the DXN to recognize
the USB Update Drive.
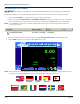
6. From the Display ► Meters screen, press the System tab on the far right of the display.
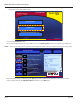
7. From the System screen, select Update (System ► Update).
Site Name0.00 GPM
4/12/2013
12:24 PM
SystemSite I/O CalAdv
Display
Meter Log
Update
Comm
Time
PC
Storage
Disk
Power
ENetMisc
Set Up Quick Boot
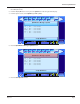
Quit Meter to Manage / Update
GUI -> Rev H =
V
001.16 20121205.0
DSP -> Rev H =
V
001.16 20121205.0
DASH -> Rev F =
V
001.12 20120821.0
BIOS -> Rev A =
V
001.00 20111112.0
OS -> Rev A =
V
001.02 20121011.0
8. Press the Quit Meter to Manage / Update button.
Site Name0.00 GPM
4/12/2013
12:24 PM
SystemSite I/O CalAdv
Display
Meter Log
Update
Comm
Time
PC
Storage
Disk
Power
ENetMisc
Set Up Quick Boot
GUI -> Rev H =
V
001.16 20121205.0
DSP -> Rev H =
V
001.16 20121205.0
DASH -> Rev F =
V
001.12 20120821.0
BIOS -> Rev A =
V
001.00 20111112.0
OS -> Rev A =
V
001.02 20121011.0
Quit Meter to Manage / Update
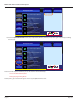
9. Press the Start Updater button.
Firmware Update Manual
Page 5 May 2013