
Owner's Manual

System Set Up
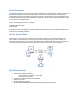
PREFACE: Before setup on the WaterCop SmartConnect, verify if the device will be connected to the internet via wireless
or ethernet cable. If using wireless, verify signal strength before choosing the location of the SmartConnect device. When
running cable from the actuator or control panel to the SmartConnect, use CAT5 or CAT6, and keep the cable 50’ or (use
the supplied short cable if signal is adequate).
Setup
1) Remove WaterCop SmartConnect from packaging.
2) Mount WaterCop SmartConnect with the supplied wall anchors or other methods to suit the location.
3) Once mounted, run a straight-through CAT5 or CAT6 cable (2’ CAT5 included) from the Classic actuator or Pro control
panel to the SmartConnect port marked ‘CONNECT TO VALVE ACTUATOR’. Power is supplied through the CAT5 or
CAT6 cable. If installed on a 120 VAC Classic actuator with antenna or the Monitoring station on an older WaterCop
Pro, the optional power supply, Part# ACA100 is required to power the SmartConnect.
Download the WaterCop SmartConnect App from the Google Play Store on your Android device or from App Store on your
iOS device. Follow the steps below to create an account and setup the device/s.
Create Account
1) Open the SmartConnect App from your device.
2) Click on ‘Create account’.
3) Enter all information; the user name must be their valid email address.
4) PASSWORD: Use their first name initial CAPITAL, last name and Property number. Example password:
DAholt10 = Dena Aholt at 10 Harris Industrial Park
5) Click ‘Create’ at the top right of the screen.
1) Make sure Bluetooth and Location services are turned on prior to set up and have adequate cellular or Wi-Fi
connection.
2) Open the SmartConnect app and login with the the CUSTOMER’s credentials you just setup in the ‘Create Account’
section above.
3) To add and setup the SmartConnect, click the blue ‘Add’ button in the top right corner while physically near the
SmartConnect. After the default name ‘WaterCop GW’ pops up, verify the MAC address is correct on the label on back
of device and carton and click the box to select it.
4) Enter the Unit ID on the carton or SmartConnect, then click ‘OK’.
5) Click on the device to configure, once loaded click the settings icon at the top right.
6) Next to the MAC address, change the name of the device to the name of the client, building or address that makes
sense for identification on the app.
7) If a Wi-Fi connection is desired, click the toggle button on the Wifi line then manually enter the Wi-Fi network and
password and click ‘Done’.
8) If no Wi-Fi is available or hard-wired connection is preferred, run a network cable from the router/modem to the port on
the SmartConnect marked “ETHERNET CONNECTION”. Make sure ‘Ethernet’ is selected on the app.
9) Press ‘GET’ on the location line under ‘Wifi’.
10) Enter the physical address of the SmartConnect. It will be displayed on the device screen.
11) Click ‘SAVE’. If it fails, try clicking ‘SAVE’ again. It may take a few tries at times.
12) Click the ‘<’ at the top left of the screen to go back to the device screen.
Setting Up Contacts & Testing Notifications
1) Click the ‘ > ‘ icon on the Contacts line under the address to view, enter and save contacts.
2) Click the ‘ Add Contact ’ at the bottom right and enter your contact info including the country code. Click ‘Done’.
3) Use the ‘ < ‘ icon to go back and check the contacts are showing; ex. 1 emails, 1 SMS.