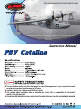
www, Instructional Manual PBY Catalina Specification: Wingspan: 1470mm{58in) Overall Length! 940mm{37in) Wing Loading: goldmine’ Servo PCs Battery: 11.
Safety Precautions e Never fly the Airplane where there are crowds of people ,power lines overhead, automobiles or near highways. give yourself plenty of room for flying, as the plane can travel at a high rate of speed. Remember you are responsible for the safety of others. o Do not fly in strong winds. » Do not attempt to catch the Airplane while flying. «Children under the age of 16 should not have admission to the transmitter for the plane.
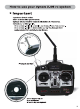
How to use aerodynamic 2. dG rc system * important 1:put down throttle sticker. 2:turn on transmitter power-switch. 3:pleases let your receiver connect with battery in 10 seconds. 4:check your protect-switch, when protect -switch in up station,put down, release from protect. when protect -switch in down station, put up freest, then put down again, release from protect,you can fly now.
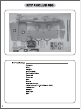
RTF INCLUDING RTF including: fuselage wing elevator landing gear Vertical stabilizer Push rod Propeller glue decal balance charger Li-Po battery (11.
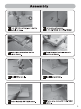
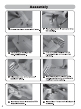
Assembly BE Push $8*495mm fiberglass tube into the hole of wing. 2 | Fix the wing with screws. © PA © PA Inset aileron servo wires into the slot as shown. Press the speed controller cover in position as shown. EJ install 8080 propelling. FE install float as shown. EZ writhe float with M3*16MM screw. Oo i Fix the wing struts with PA 2 5*8MM Screw.
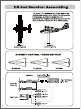
Assembly B Connect the aileron servos with Y wires. i Insert speed controller and servo wires into fuselage. ig Fix the wing on fuselage with PA screw. i Push ©5"235mm fiberglass tube into horizontal stabilizer and fuselage, then glue them 13 Glue another side of the horizontal stabilizer in place. 7 Insert the push rod into elevator quick controller and tighten the screw(the servo should be in center position). x i Insert speed controller wires into THR channel! of receiver.
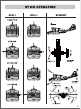
CG And Receiver Assembling The ideal C.G. position is 80~85mm behind the leading edge measured at where the wing meets the fuselage. in order to obtain the C.G. specified, add weight to the fuselage or move the battery position. Check the C.G. before flying. §0-85mm 60-85mm Center of gravity Center of gravity SUGGEST CONTROL THROW SETTING 520MM {15-20MM 12-16MM {12-15MK ELEVATOR AILERON RUDDER ES C-30A Leads with silicon 11.1V 2200mAh Li-Po 20C Elevator Servo EE Alsen(Rj8erve i = 2.
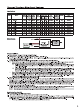
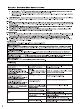
Manual of Brush less Motor Speed Controller IRE Claus Model Cont, | Burst | BEC Waiter Coll | User | Balance | Weight Size Currents | Coherent | Mode NIGH programmer-| Discharge LSWYH 108) | (Nosed) Mig | able | Protection 124 Es-12 124 154 | Switch 5-12 | Available NA 15g 4552475 184 Bag-12 184 | 224 | With 512 | Valid] NWA 1g 254 Flo-25 154 354 | Switch 5-12 | Available NA Hg 45%24%11 304 Es-30 30A | 40A | Switch 512 | Available NA 25g 45724711 407 E so-dl ABA | SSA | Switch 5-18 | Available N/a 35g 55%28
Manual of Brutishness Motor Speed Controller © Ifa special tons = J 567177 is emitted after 2 beep tones means the ESC has entered the program mods, iris because the throttle channel of your transmitter i3 reversed, please set it correctly; & if the very rapid “esp-beap-, baps-beep-” fonts is emitted, means the input valiant is too low or tue high, please check your battery's voltage.
Manual of Brush less Motor Speed Controller Incarnation paste Move throttle | | Connect battery || several ‘beep tones | | When eff-teat is | | Mace throttle stick tick t ack to ESC, stile ° ° .
1“ How to enter the programming mode of the Dynamo's brush less ESC with the Dynamo 2.4Ghz radio system: (Warning: Please disconnect the motor from the ESC before starting the following procedure) 1} Turn on the transmitter, then connect battery to the receiver, let the normal auto binding process completed. {Both LED lights on transmitter and receiver should flash rapidly at the same time for this process to succeed) 2) Disconnect the receive power; do not turn off the transmitter.
13 Battery Warning And Charging Lithium-polymer batteries are a revolutionary new rechargeable battery technology for electric R/C flight, offering a variety of significant advantages over Ni Cd, Nigh and Lion batteries. It is very important to have a good understanding of the operating characteristics of Li-Po batteries especially their exact rated voltage. Always read the specifications printed on the label of your Li-Po battery prior to use, and read this instruction sheet in its entirety.
Battery Warning And Charging The charger requires up to 1.5 Amps of 10-15 Vito DC input power that can be supplied from a small 12V gel cell or car battery. input power for the charger can also be supplied through the use adapter/power supply for convenient charging anywhere an AC outlet is available. We recommend the optional AC to 12V DC, 1.5 Amp Power Supply. NEVER attempt to power the charger from an AC outlet without the use of a proper AC to DC adapter/power supply.
15 Battery Warning And Charging Once you have connected the charger to a power source, The red LED will turn on. Connect the Li-Po battery pack to the charger When the park is full charged The green LED will turn on. Install the Tran tier Ballerinas Install 8 new "AA" batteries in the included transmitter. Check the power level of the batteries and operation of the transmitter by switching the power switch on (upward).
visit our website BC Hobby Co.