
Label Maker User Manual


Getting Started
6
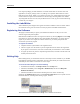
To change the graphic
1 Double-click the graphic that appears on the label.
The Graphic Settings dialog box appears.
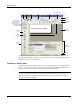
2 Select File under Select Graphics Source.
The Insert Image button changes to read Select File.
3 Click Select File.
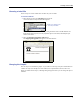
The File open dialog box appears listing the contents of the default Clipart folder.
4 Select the Miscellaneous folder and click Open. The contents of the Miscellaneous folder
appear.
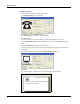
5 Select Comput1.bmp from the Miscellaneous folder.
A preview showing the contents of the Comput1.bmp graphic file appears in the dialog box.
6 Click Open.
The Comput1.bmp graphic appears in the Graphic Settings dialog box.
7 Click OK.
The computer graphic is placed on the label replacing the telephone graphic.