
Installation Guide


www.dyconnfaucet.com
4
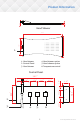
Installation of Shower Control Box
1. Designate desire height for the shower panel/ column on the wall.
2. Make a cut out inside the wall to fit our stainless steel box.
3. Please make sure the stainless steel box is flushed (same level) & align with the
wall tile.
4. Stainless steel box CANNOT be deeper than last layer of wall tile or raised more
than the wall tile. Failing to follow this step will result in the shower bring
installed NOT level with the wall.
5. Please avoid using any type of tile or tile insert that has raised profile behind
the shower column to ensure the shower colmun fit flat against the wall.
6. Bring HOT & COLD pipes to the stainless steel box from the sides or the back of
the wall depending on your wall.
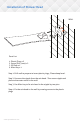
7. Every shower panel/ column have two supply hoses with 1/2” male thread to
allow to connect the shower panel/column flex hoses to the hot/cold water
sources.
8. Water pipes must be flushed and cleaned before connecting the flexible hoses
to the hot/cold water lines to ensure no dirt go inside the shower faucet.
9. After the final tile is installed, you can fix shower panel/column to the stainless
steel steel box without any screws.
Note:
Stainless steel box must be on the same level (flush) with final layer of wall tile to
ensure the shower column fits ont hte smae level as wall tile.