
Installation Guide

Installation Guide
For Arlington, Monterey, Reno, and
London Bathroom Accessory Series
Installation:
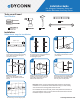
Follow these steps for installation.
Approx. 23.5”
Using a level and measuring tape,
measure the distance between mounting
plates. Mark screw points with tip of
screwdriver or pencil.
Prepare fastener holes for attaching
the mounting plates using options below:
A. Attaching to stud in drywall.
B. Attaching to drywall.
Attaching to stud in drywall:
Use drill bit smaller than the screws to
pre-drill holes.
Attaching to drywall:
Use drill size appropriate for wall
anchors. Tap each anchor in wall with
hammer.
The accessory is now securely in place.
Side View
Tools you will need
Tool Checklist.
Important: Please use the provided beige wall anchors for drywall-only
installation. To use, follow the above-referenced steps, but concurrently
screw in both screw and beige wall anchor into wall.
For installation on tile surface/wall, please seek professional assistance at
your local hardware store or consult a licensed contractor. Please note tile
installation requires a tile drill bit.
1. 2.
3.
5.
4.
2a.
2b.
www.dyconnfaucet.com
Accessory
Attach accessory to the mounting plate
Use provided hex key to tighten the hex
head located on the underside of the
accessory to secure the product.
Attach each mounting plate to wall by
installing screws into pre-drilled wall
anchor holes. (Base plate may look
different than shown here.)