DXG-538 User’s Manual DXG USA
Preface Thank you for purchasing this advanced digital camera. Please read this manual carefully and keep in a safe place for future reference. About this Manual Every effort has been made to ensure that the contents of this manual are correct and up to date. However, the company cannot guarantee the accuracy of its content. Should the contents of the manual be not completely consistent with the camera, please take the camera to be accurate.
Safety ‧ Do not attempt to charge non-rechargeable batteries. ‧ When using AAA-size batteries with the product, ensure that they are correctly placed. Loading batteries in the reverse polarity may cause damage to the product and combustion. ‧ Do not place or use the product in a dusty, dirty, or sandy place as it will cause damage to the components of the product. ‧ Do not store the product in places exposed to extremely high temperatures.
Contents Preface About this manual ............................................................... 1 Copyright.................................................................................. 1 Safety ................................................................................ 2 Introducing the camera System requirements................................................................. 6 Features..................................................................................... 6 Unpacking ..........
Changing the LCD display.................................................. 20 Photo mode............................................................................. 20 Icons in Photo mode ........................................................... 20 Setting the flash .................................................................. 21 Using the Macro feature ..................................................... 22 Using the zoom function.....................................................
White balance ..................................................................... 36 EV....................................................................................... 37 Icon display......................................................................... 37 Playback menu ....................................................................... 37 Delete one ........................................................................... 38 Delete all......................................................
Introducing the camera Read this section to learn about the features and functions of the camera. This chapter also covers system requirements, package contents, and front and rear views. 1.1 System requirements The camera requires a PC with the following specifications: ‧Windows XP, 2000 and ME operating system ‧Intel Pentium Ⅲ500 MHz CPU or higher ‧At least 256 MB of RAM or higher ‧Standard USB 1.1 port or higher ‧4 X CD-ROM drive or higher ‧At least 200MB of available disk space Note:USB 1.
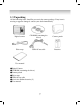
1.3 Unpacking All the following items should be present in the camera package. If any item is missing or appears damaged, contact your dealer immediately.
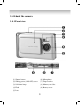
1.4 About the camera 1.4.
1.4.
Getting started 2.1 Installing the wrist strap ● Put one end of the wrist strap through the mount. ● Tighten. ● Put the other end of the wrist strap through the first end. 2.2 Loading the Batteries ● Be sure that the camera is in the “off” position. (Please refer to page 12) ● Before using, please insert two AAA-size alkaline batteries or rechargeable batteries correctly according to their indicated polarity. Please check the charge of the batteries.
● Closing the battery cover Note: Do not apply excessive force on the battery cover as it may cause damage. ※ ※ ※ When using your digital camera, if the battery charge is one mark on the battery level icon, you will not be able to continue operating the flash. When the battery charge turns red, you will not be able to continue to operate “Photo mode” and “Movie mode”. When replacing the batteries, the camera retains the date/ time settings for approximately three minutes.
Note: Before using, please insert your SD memory card into the memory card slot on the bottom of the camera. If the card is full or contains other data, you can access using the Mode Selector button to format your Format in “Setup mode” memory card. ● The digital camera has a built-in memory of 32MB. When a memory card is inserted into the camera, the camera will take it to be the primary storage media. ※ The camera accepts only SD or MMC memory cards.
● Slide the power cover on the top of the camera sideways to start-up, Switch the power on and off. When the camera is switched on, the red indicator light will flash, an image will appear on the LCD display. ※ This camera comes with three power saving options: Off, 1 minute, 3 minutes. If the camera remains on and inactive throughout the preset power saving period, the camera will automatically switch off. To switch it on again, slide the power cover in the “off” position, and “on” directions successively.
2.6 Before you start Before you use your camera, there are some basic settings to configure. These settings will be illustrated in chapters that follow. 2.6.1 Setting the date and time 1. Please switch on the camera as shown in 2.4 “Turning on for the first time”. 2. Press and hold on to the Mode selector button for two seconds to access the modes Main menu. Use the Up/ Down selection buttons to highlight the options then press the Set/ Function button to confirm. 3.
4.Select the required language using the Up/ Down selection buttons. 5. Press the Set/ Function button to save the new settings. Press Mode selector button to exit the Menu without saving the changes. Setup mode 2.7 Taking your first still picture Before taking your first still picture, please be sure that you have read 2.6 “Before you start”. To take a still picture: 1. Switch on the camera and ensure that it is in the Photo mode. 2. Use the LCD to frame the picture. 3.
2.9 Connecting to a PC Read this section carefully to learn how to transfer files to the PC, or use the camera as a PC web camera for meetings. Using USB cable to connect the camera to the PC: 2.10 Connecting to a TV Connect the camera to a TV using a USB cable as shown.
Using the camera Please read this section to learn how to use the camera. 3.1 Using the Shutter button All of the buttons are found on the top or back of the camera.
Please see the table below for the functions of each icon and symbol. Button Description Features Up shift selector button/ Down shift selector button ● Up/ Down shift selector buttons control the zoom in Photo mode. ● Up/ Down shift selector buttons stop the playback of video clips in Video mode. ● Up/ Down shift selector buttons navigate (up/ down) the selection options or navigate (trans-page) selections. Set/ Function button ● Set/ Function button controls the flash in Photo mode.
● Shutter button captures the picture in Photo mode. ● Shutter button starts/ stops the video capturing in Video mode. ● Shutter button plays or pauses video playback in Playback mode. ● Shutter button allows games selection in Games mode. Shutter button 3.2 About the indicators Please see the table below for the functions of the indicators.
3.3.1 Changing the LCD display You may decide not to display icons on the LCD screen by following the instructions below. 1. Ensure that you are either in Photo mode or Video mode. If you are in neither, please select either mode from the modes Main menu. 2. Press the Mode selector button once to access Quick menu. Select the options using the Up/ Down shift selector buttons. After selecting the icon, use the Shift selector buttons to select ON or OFF. 3.
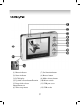
Please see the table below for the functions of the icons. Description Icon 1 Photo mode. 2 Memory card status. Please read 2.3 for details on inserting and removing the memory card. 3 The number of pictures taken. 4 Battery charge status. 5 Digital zoom lever, details on using the zoom can be found in 3.4.4. 6 Flash mode indicator, details on setting the flash can be found in 3.4.2. 7 Time and date display. 3.4.2 Setting the flash This camera has three different modes of flash.
Icon Description Flash is disabled. Automatic flash, which will be activated only when necessary, for example for the use of flash in dim places and when no flash is used in bright places. Forced flash, which will be activated under any circumstance. 3.4.3 Using the Macro feature The macro function enables you to capture images of subjects very close to the lens. In Macro mode you can focus on subjects as close as 17 cm. When the Macro mode is not in use, the minimum focal distance is 19 cm.
3.5 Video Mode Use Video mode to capture video clips and store them in the internal memory or icon indicates Video mode. on an SD card. 3.5.1 Icons in Video mode Use the following diagram to familiarize yourself with the Video mode icons and symbols. Please see the table below for the functions of the icons. Icon Description 1 Video mode. 2 Recording time (Seconds) 3 Status: Recording.
Icon Description 4 Battery charge status. 5 Time and date display. 3.5.2 Using the Zoom feature Please see 3.4.3 “Using the Macro feature”. 3.6 Playback mode 3.6.
Please see the table below for the functions of the icons of Playback mode. Icon Description 1 The current number of pictures. 2 Recording time (Seconds). 3 Video clip. 3.6.2 Viewing pictures and videos To view pictures and videos: 1. Switch on the camera and make sure that it is in the Playback mode. The most recent picture or video clip will be displayed on the LCD display. 2.
3.6.3 Using thumbnails mode In Playback mode, per factory settings, camera displays images to fit LCD. But it is also possible to display nine thumbnails on the LCD. To view thumbnails: 1. Switch on the camera and ensure that it is in the Playback mode. The most recent picture or video clip will be displayed on the LCD display. 2. Press Set/ Function button to access the Playback menu. 3. Press Mode selector button twice to display nine thumbnails per screen. 4.
computer via the USB cable, the camera can be set to either the USB Mass Storage or Video camera options. 3.7.1 Storage option mode The digital camera can act as an external storage or even as a card reader. This camera can be used as an SD card reader with the following settings: 1. Please follow the instructions and install the application as shown in “Installing software and driver”. 2. Switch on the camera. 3.
1. Please follow the instructions and install the application as shown in “Installing software and drivers”. 2. Switch on the camera. 3. Press the Mode selector button and use the Up/ Down shift selector buttons to select the PC mode option. 4. Press Set/ Function button to access the selected icon. The options “Mass Storage” or “PC Camera” will be displayed on the LCD. 5.
The icons and names of the games are as follows: Boxboy Tetris Memory GoBang The descriptions on how to play each game are as follows: Boxboy ●When the game begins, please turn your camera 90o clockwise and hold it this way to play the game. ●Use the Up/Down Arrow button to control the horizontal movements of the boy and the boxes. Use the Browse button to move down and the Mode Selection button to go up.
● Press Shutter to exit the game and return to the game menu. Tetris ● When the game begins, please turn your camera 90o clockwise and hold it this way to play the game. ● Use the Up/Down Arrow button to move the blocks horizontally; hold the button to make the blocks move faster. You can rotate the blocks with the Mode Selection button and hold the Browse button to make the blocks fall faster. Press the OK/Function button once will pause the game; press it again to resume.
up. Press the OK/Function button to reveal the picture you have selected; if the next picture you choose is the same as the first one, then the pair of pictures will be eliminated. If the second picture you choose is different from the first, the next selection you make will cover up the first two pictures and the counter on the bottom left of the screen will increase by 1. The counter represents the number of misses you have made.
Using the setup menus Read this section to learn how to configure the camera and use the advanced features. 4.1 Camera menu The Camera menu appears when the camera is in Photo mode and the Mode selector button is pressed. The Camera menu is only available in Photo mode. Mode selector button The Camera menu can only be used in either the Photo or Video modes. 4.1.1 Photo resolution Use the image size option to set the size of the image captured.
To set picture quality: 1. Turn the camera on and ensure that it is in Photo mode. 2. Press the Mode selector button. 3. Use the Down shift selector button to navigate until the Quality option is highlighted. 4. Use the Up shift selector button to select: Fine , Normal . 5. Press the Mode selector button to confirm and exit the menu. 4.1.3 White Balance Use the white balance option to correct color for different lighting conditions.
3. Use the Down shift selector button to navigate until the Self-timer option is highlighted. 4. Use the Up shift selector button to select: ON , OFF . 5. Press the Mode selector button to confirm and exit the menu. 4.1.5 EV Use the exposure compensation (EV) setting to change the exposure for your pictures.
4.1.6 Date Display Use the time function to control turning the date/ time stamping on or off when taking a picture. To set date display: 1. Turn the camera on and ensure that it is in Photo mode. 2. Press the Mode selector button. 3. Use the Down shift selector button to navigate until the Time display option is highlighted. 4. Use the Up shift selector button to select: ON or OFF 5. Press the Mode selector button to confirm and exit the menu. 4.
4.2.2 Video quality Use video quality option to set the quality of the video captured. This camera has two quality options: Fine and Normal. Videos taken with the Fine option will require significantly more memory space than those taken with the Normal option. To set video quality: 1. Turn the camera on and ensure that it is in Video mode. 2. Press the Mode selector button. 3. Use the Down shift selector button to navigate until the Video quality option is highlighted. 4.
4.2.4 EV Use the exposure compensation (EV) setting to change the exposure for your videos. Usually this value would be set to zero, but you might want to increase the exposure to brighten a scene with strong back lighting, or decrease the exposure if shooting a video in a very bright environment. To set EV: 1. Turn the camera on and ensure that it is in Video mode. 2. Press the Mode selector button. 3. Use the Down shift selector button to navigate until the EV option is highlighted. 4.
4.3.1 Delete one Use the Delete one function to delete files. To delete file: 1. Turn the camera on and ensure that it is in Playback mode. 2. Press the Set/ Function button. 3. Use the Up shift selector button to navigate until the Delete option is highlighted. 4. Use the Down shift selector button to select: Delete one 5. Press the Set/ Function button to proceed with deleting. A confirmation in the form of a dialogue will be displayed. To delete, press OK, else, press Cancel.
individual pictures. You can also select how many copies print and whether to include the date and time. DPOF requires a memory card. When all images to be printed are tagged, remove the memory card and take it to an image studio for printing, or use it with a DPOF compatible printer. To print images: 1. Turn the camera on and ensure that it is in Playback mode. 2. Press the Set/ Function button to select. 3. Use the Up shift selector button to select the DPOF option. 4.
4. Use the Down shift selector button to select and set: print all, select single print, date stamp visible or invisible, select print all, press Set/ Function button to access menu, use Up/ Down shift selector button confirm or cancel. Afterwards, press Set/ Function button to start printing or cancel.
※ Note: the internal Flash memory’s copy is only compatible with DCF documents. ※ If the external card has a DCIM parent directory and a 100FSCAM child directory, the documents will be duplicated onto the 100FSCAM directory. Either way, the system will first attempt to create a DCIM parent directory with a 100FSCAM child directory, and duplicate the files into 100FSCAM.
1. Turn the camera on and ensure that it is in Setup mode. 2. Use the Up shift selector button to select option and use the Down shift selector button to select auto-power off. 3. Press Set/ Function button to access the menu, press the Up/ Down shift selector button to select three minutes, one minute, set to on or off. 4. Press Set/ Function button to confirm. 5. Press Mode selector button to exit. 4.4.5 OSD Language Please read 2.6.2 “Setting the language”. 4.4.
5. Press Mode selector button to exit. 4.4.7 Frequency The setting of frequency will prevent the occurrence of flashing due to the local frequency rate. For detailed information, please contact your local energy provider. 1. Turn the camera on and ensure that it is in Setup mode. 2. Use the Up shift selector button to select option and use the Down shift selector button to select the frequency. 3. Press Set/ Function button to access the menu, press the Up/ Down shift selector button to select NTSC or PAL.
3. Press Set/ Function button to access the menu, press the Up/ Down shift selector button to select or cancel. 4. Press Set/ Function button to confirm. 5. Press Mode selector button to exit.
Installing software and drivers 5.1 Drivers When the camera is connected to the PC, the camera can be used as either a Mass Storage or a computer-based video camera. Mass storage The digital camera offers Mass Storage function as a card reader device. You can treat this digital camera as an SD card or mass storage device. You will only need to install a driver for the camera if your operating system is Windows 98SE.
Install button 3. Click the install button to install the driver. 4. Follow the on-screen instructions. 5. Click Finish to restart the computer and the camera driver installation is completed. Installing the driver 1. Insert the supplied CD-ROM in the CD-ROM drive. 2. If the CD-ROM doesn’t automatically boot, use Windows Explorer to execute the InstallMgr.exe file in the root directory. 3. Click the install button to install the driver. 4. Follow the on-screen instructions. 5.
To install Presto! Video Works 6: 1. Insert the supplied CD-ROM in the CD-ROM drive. 2. If the CD-ROM doesn’t automatically boot, use Windows Explorer to execute the InstallMgr.exe file in the root directory. 3. Click the install button to install the driver. Follow the on-screen instructions. More information about Presto! Video Works 6 can be found in the complete installed files. 5.3 Presto! Mr. Photo 3 Presto! Mr. Photo 3 is an advanced photo editing software application. To install Presto! Mr.
Appendix A: Specifications General Imaging sensor 1/1.8” 5.17 Mega pixel CMOS sensor Active pixels 5.1 Mega pixel Storage media Built-in 32 MB Flash memory Supports SD/ MMC memory cards (be able to support at most 1 GB) Sensor sensitivity Auto Lens Fixed lens, F3.0/8.0,f=8.25mm Focal range Normal: 4 feet ~ infinity Macro: 5.5~6in.
General Shutter Mechanical shutter 1/4 ~ 1/500 second Auto power off 1 minute, 3 minutes or Off (User definable) Battery Two AAA-size Alkaline batteries Dimension 3.48" (L) x 1.12" (D) x 2.32" (H) Weight Approximately 3.
Appendix B: PictBridge Troubleshooting Type Paper Error Number 256 257 258 259 260 261 262 263 Ink Hard ware Docu ment 512 513 514 515 768 769 770 771 772 773 774 775 776 777 1024 1025 1026 Description Paper related error Out of paper Wrong feed – paper feed is incorrect Extraction error – paper is incorrectly extracted Media error – Cannot detect paper, paper is displaced, paper cannot be cut or is loaded the reverse way Paper jam Paper level low The pieces of paper are of different sizes, or the
Website Please visit our website at www.dxgusa.com for any product updates or special announcements.